Tempo indicates the speed at which your project and all of its regions are played back. It is a factor that determines musical genre and the mood of a song so it’s important that you know how to change it in Logic Pro.
In this guide, we’ll reveal how you can adjust the tempo and tempo mode of your Logic Pro projects, along with how to make tempo changes mid-song and tap tempo.
Without further ado, let’s dive in!

| How To Change Tempo In Logic Pro
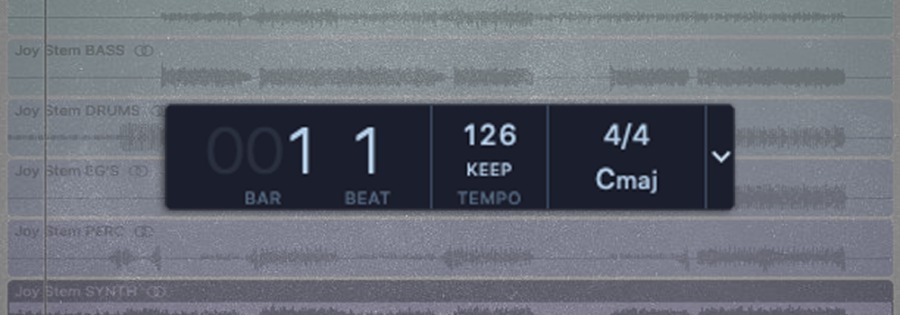
To change tempo in Logic Pro, navigate to the top of the Logic window and locate the tempo display. By default, the tempo is set to 120 bpm. Left-click and drag vertically to speed up or slow down the tempo, or double-click it and type in a new tempo.
![]()
| Project Tempo Modes
Listed below your project’s tempo is the tempo mode. Logic comes with three different tempo modes: Keep, Adapt and Auto. You can change the tempo mode by left-clicking below your project’s tempo and selecting from the drop-down list.
KEEP: This mode will maintain the current project tempo.
ADAPT: Select “Adapt Project Tempo” to adapt the project tempo when recording, importing or editing files with a different tempo.
AUTO: When Auto Mode is selected, Logic Pro will use Keep or Adapt behaviour based on whether a tempo reference (eg. the metronome or playing regions) is present.

| How To Change Tempo Mid-Song
Step 1: Reveal Global Tracks
To change the tempo in the middle of a Logic Pro project, start by revealing the Global Tracks. You can do this by selecting the icon above the Pan/Balance knob of your first track. Alternatively, press [G] on your keyboard.

Step 2: Locate Tempo Track
Next, locate the tempo track. The current tempo of your project will be displayed at the beginning of the automation envelope.

Step 3: Automate Tempo Track
Lastly, make tempo adjustments mid-song by creating points and shaping the track automation. You can left-click the automation envelope to create a point and double-click a point to delete it. Left-click and drag the automation envelope up or down to adjust the tempo.

| How To Tap Tempo In Logic Pro X
Step 1: Open The Key Commands Menu
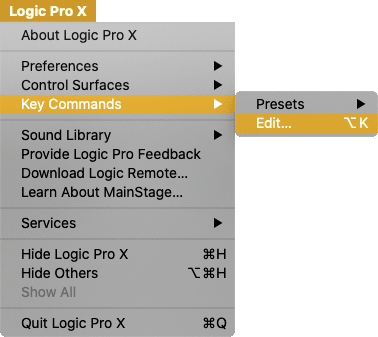
To tap tempo in Logic Pro, you first need to assign a key command to tap tempo. You can do this by heading to the Logic Pro X menu in the top-left corner of your screen and selecting ‘Key Command’ > ‘Edit…’.
Alternatively, you can access this menu by using the keyboard shortcut [OPTION] + K.

Step 2: Assign A Key Command To ‘Tap Tempo’
Next, type ‘Tap Tempo’ into the search bar in the top right of the key commands menu. Under Global Commands, left-click ‘Tap Tempo’. On the right of the key commands menu, type in the key command you would like to assign into the box beside ‘Key:’ (eg. Shift + R).

Step 3: Enable ‘Auto-Enable External Sync And Tap Tempo’
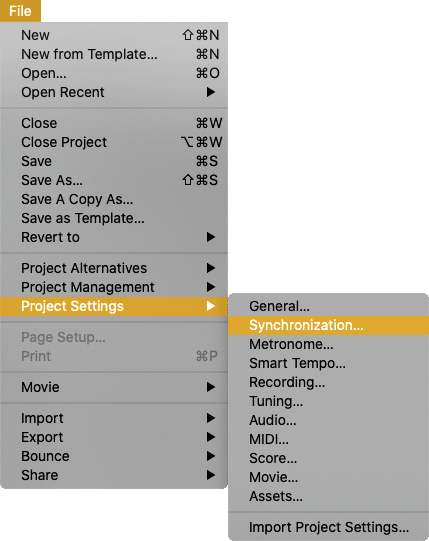
Head to the File menu at the top of your screen and select ‘Project Settings’ > ‘Synchronization…’.

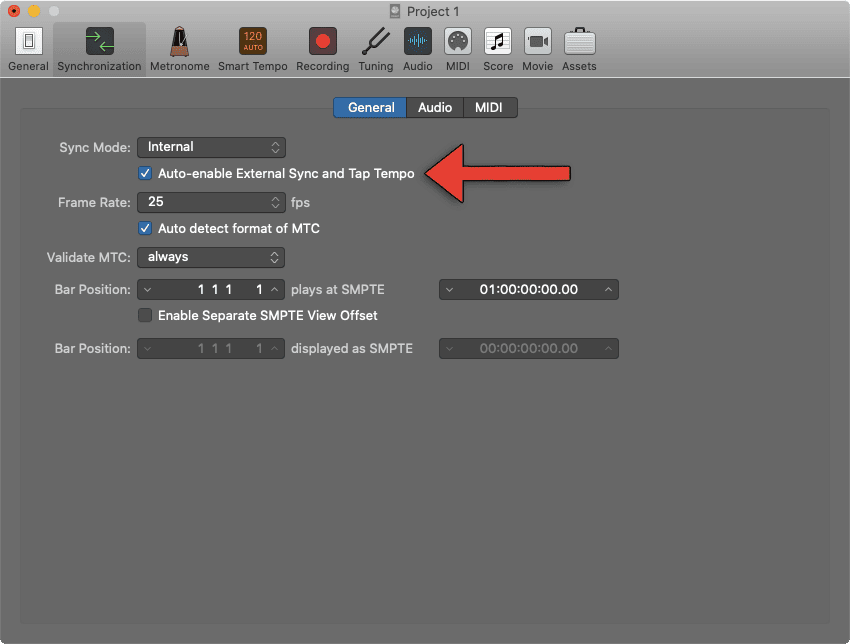
Under Sync Mode, tick the box beside ‘Auto-Enable External Sync And Tap Tempo’.

Step 4: Tap Tempo
Lastly, close the project settings window and use the assigned key command to tap the tempo of your project. On the fifth tap, Logic will start playing back your project at the new tempo you have set.

Related Posts:
How To Reverse Audio In Logic Pro
How To Nudge Regions In Logic Pro
How To Insert Arrangement Markers In Logic Pro
Want To Know More?
Here at Live Aspects, we have dozens of useful lessons and tutorials created to enhance your music production skills and help speed up the learning process. You can access our huge range of music theory lessons and production tips and tricks here.