Audacity is a powerful tool that can help you make all sorts of adjustments to audio, including changing key. Whether you’re looking to transpose an entire song or slightly adjust the pitch of a sample, Audacity can be used to transpose the key of any audio sample without affecting tempo.
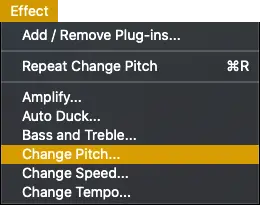
To change the key of audio in Audacity, select the audio clip from the Track Window and select ‘Change Pitch’ from the ‘Effect’ menu. Next, select the desired key from the ‘to’ drop-down box or adjust its pitch by adding or subtracting semitones (half-steps).
In 5 easy steps, I’ll explain the entire process from start to finish and teach you how to change the key of an audio recording without affecting tempo. Learn how to import audio, transpose its key and export your tweaked audio recording in less than a minute.
- | Step 1: Import Audio
- | Step 2: Select Your Audio
- | Step 3: Add ‘Change Pitch’ Effect
- | Step 4: Change Key
- | Step 5: Export Audio
Without further ado, let’s dive in!

| Step 1: Import Audio
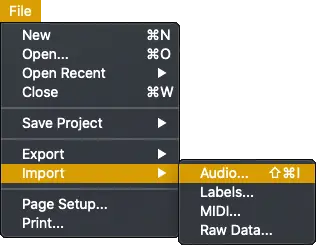
Import your audio by accessing the File menu and then selecting Import > Audio. Alternatively, you can simply drag and drop your audio from Finder/File Explorer onto the Track Window in Audacity. Compatible file types include WAV, AIFF, and MP3.

Once you have imported your audio recording, you will see its waveform appear on the timeline.

| Step 2: Select Your Audio
Select your audio file by clicking on the white bar above the waveform. The clip will turn blue when selected. If you want to change the key of multiple audio clips, simply press [COMMAND/CNTRL + A] on your keyboard to select all clips.

| Step 3: Add ‘Change Pitch’ Effect
Next, navigate to the ‘Effect’ menu and select ‘Change Pitch…’. A new window will appear with a series of options.

| Step 4: Change Key
You can adjust the key of your sample by adding or subtracting semitones (half-steps) to the current key of the audio. Simply type in the number of semitones you would like to adjust the key by in the box beside ‘Semitones (half-steps)’.
Alternatively, you can select the new key of your audio from the ‘to’ drop-down box. Audacity will attempt to detect the key of the selected audio clip/s and display it in the ‘from’ box.

Optional: Tick the box beside ‘Use high quality stretching (slow)’ for the best quality result.
| Step 5: Export Audio
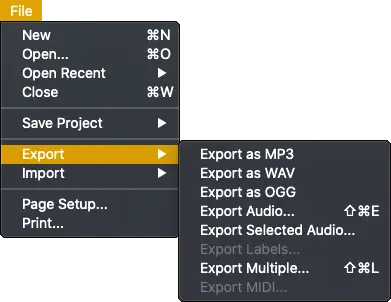
Lastly, save your new audio to your computer by navigating to the ‘File’ menu and selecting from the various ‘Export’ options. To save your audio to a format other than the ones listed in the Export menu, select ‘Export Audio’ and select from the list of different file types.

Related Posts:
How To Convert MP4 To MP3
How To Make Audio Louder In Audacity
Best Music Production Software In 2022
Want To Know More?
Here at Live Aspects, we have dozens of useful lessons and tutorials created to enhance your music production skills and help speed up the learning process. You can access our huge range of music theory lessons and production tips and tricks here.