Ableton Live is the perfect tool for guitarists. It contains features that make it easier than ever to perform and record guitar, as well as the ability to run a fully functional guitar rig all on your computer. Adding electric, acoustic or bass guitar to your Ableton projects can be achieved in just a matter of minutes.
Hi, I’m Ben from Live Aspects and in this guide, I’ll be explaining the best way to record guitar using Ableton Live.
- | Step 1: Plug-In Guitar
- | Step 2: Setup Audio Interface
- | Step 3: Create Audio Track
- | Step 4: Select Microphone Input
- | Step 5: Prepare To Record
- | Step 6: Record Guitar
Without further ado, let’s dive in!

Before we begin, make sure your audio interface is plugged in and any required drivers have been installed.
| Step 1: Plug-In Guitar
Start by plugging your electric, acoustic or bass guitar into an audio interface. Most audio interfaces can accept 1/4″ jack cables, the same cable you would use to plug your guitar into an amplifier. Alternatively, you can plug in and record using a microphone if you would prefer not to record your guitar’s input directly.
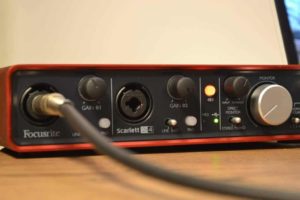
| Step 2: Setup Audio Interface
Next, ensure the audio input and output settings in Live are set to your audio interface. Click on the Live (Mac)/File (Windows) menu in the top left corner of your screen and select Preferences. Next, select the Audio tab on the left of the Preferences window. Lastly, select the applicable Driver Type, Audio Input Device and Audio Output Device from the drop-down boxes.
If you need some help setting up and using a Focusrite interface with Ableton Live, make sure to visit our previous guide titled ‘How To Use A Focusrite Audio Interface With Ableton’.

| Step 3: Create Audio Track
Next, create an audio track by selecting ‘Insert Audio Track’ from the Create menu. Alternatively, press [COMMAND + T] on Mac or [CNTRL + T] on Windows.
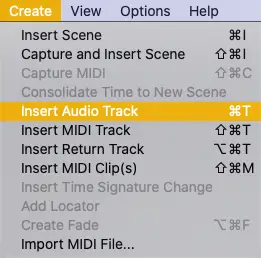
| Step 4: Select Microphone Input
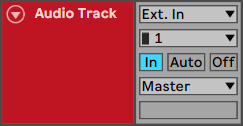
On your new audio track, select the Input Type and Input Channel. For the Input Type drop-down box, ensure Ext. In is selected. When selecting the Input Channel, select whichever input slot your guitar is plugged into on you audio interface. If you are unable to see the In/Out Section (as seen below) on the audio track, press [COMMAND + Option + I] on Mac or [CNTRL + Alt + I] on Windows.
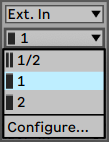
If you would like to hear how your guitar sounds through your studio monitors or headphones, enable Monitoring by selecting the ‘In’ button on the audio track.
| Step 5: Prepare To Record
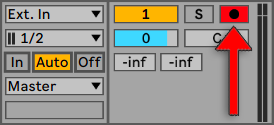
Select the Arm Recording button in the mixer section of your audio track. Once recording is armed, adjust the gain knob on your audio interface until your guitar is at an appropriate volume. Use your track’s peak level monitor to ensure the input of your guitar isn’t clipping.
| Step 6: Record Guitar
It’s time to record! Select the beat|bar on the arrangement view where you would like recording to commence. Finally, hit the circle record button at the top of the Live window to begin recording. To conclude recording, press the square stop button or press [SPACEBAR] on your keyboard.
To set a count-in, start by accessing the drop-menu on the right side of the metronome icon. Locate the ‘Count-In’ category and select the duration of the count-in. You can select between a 1, 2 or 4 bar count-in.
![]()
| Optional: Add FX
To achieve a better sounding guitar recording or a specific guitar tone, be sure to experiment with Live’s collection of audio effects. Commonly used guitar effects include delay, reverb, distortion, chorus and EQ. To access Live’s library of audio effects, head to the Browser and select the Audio Effects tab. Once you have selected an effect plugin, drag and drop it onto your audio track or simply double-click it to add it to the selected audio track.
Live also has the ability to host incredible third-party effects such as Native Instruments’ Guitar Rig. Feel free to search the internet to find hundreds of free and paid guitar effects that are ready to use in Ableton Live. If you need a hand installing VST plugins, visit our previous guide titled ‘How To Install VST Plugins In Ableton’.

Want To Know More?
Here at Live Aspects, we have dozens of useful lessons and tutorials created to enhance your music production skills and help speed up the learning process. You can access our huge range of music theory lessons and production tips and tricks here.