Background noise can make audio recordings such as podcasts, vocals, interviews or livestreams unpleasant to listen to. It can distract listeners from the intended content of a recording and decrease the quality of any audible material. Whether it’s white noise, static, traffic or talking, removing background noise from an audio sample is simple and important.
The best way to remove background noise from an audio recording is by using a Noise Gate. By configuring the simple parameters on a Noise Gate plugin, you can remove unwanted background noise and keep the focal portions of an audio sample.
In this guide, we will be unpacking the best way to remove background noise from any type of audio recording in Ableton Live. Achieve a flawless audio recording using Live’s Noise Gate plugin.
Without furthur ado, let’s get started!
| What Is A Noise Gate?
A Noise Gate is an audio effect plugin used to control the volume of an audio signal. They reduce the volume of an audio signal each time it drops below a determined level, called a Threshold. A Noise Gate is the best tool for removing background noise in Ableton Live.
As background noise is generally quieter than the main content of an audio recording, a Noise Gate is able to further reduce and remove the background noise between the louder, focal portions of a recording.
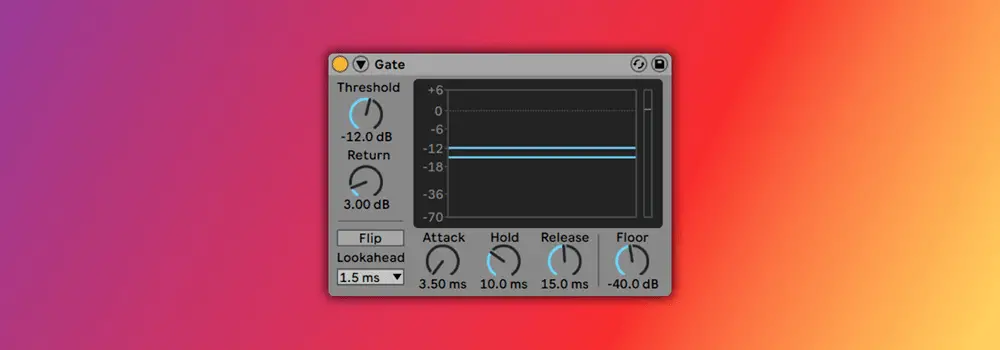
Below is a description of the parameters of a typical Noise Gate plugin:
Threshold: The level at which the gate allows sound through. Audio must exceed this level in order to be heard.
Return: Sets the difference between the threshold level that opens the gate and the level that closes it.
Attack: The time it takes for the gate to open after the threshold is reached.
Hold: The amount of time the gate will remain open after the signal level has fallen below the threshold.
Release: The time it takes for the audio signal to reach 0dB once the signal has dropped beneath the threshold.
Floor: The amount by which the audio signal is reduced each time the gate is closed.
| Ableton’s Gate Plugin
The Gate audio effect is Ableton’s Noise Gate plugin. It comes with the Standard or Suite Edition of Ableton Live.
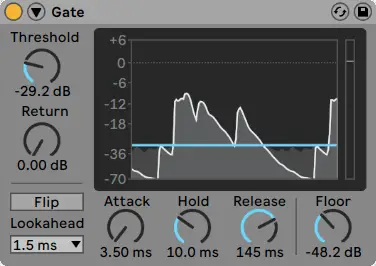
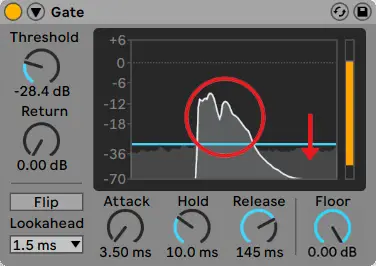
It features a gate activity display which shows the input and output levels over time. This display helps to achieve a more precise gating effect by visualising the audio’s waveform and gate parameters. The light grey waveform with white outline represents the output heard from the gate effect while the dark grey waveform represents the audio being silenced.
The blue line represents the threshold. Any sections of an audio sample that are at a volume below this line will be muted. In the graphic below, you can see the background noise is sitting comfortably below the threshold amount, allowing the audio portions we want to hear to pass through the gate.
| How To Remove Background Noise
Step 1: Load Audio Recording
Start by creating an audio track by pressing [COMMAND + T] on Mac or [CNTRL + T] on Windows. Next, drag and drop your audio recording from Finder/File Explorer or Live’s Browser onto the audio track.

Step 2: Add ‘Gate’ Plugin
Next, we are going to add the Gate audio effect onto the audio track containing our audio sample. Head to Live’s Browser, select the ‘Audio Effects’ tab and drag and drop the ‘Gate’ plugin anywhere on the audio track.
Step 3: Adjust Gate Parameters
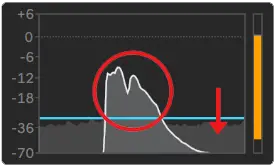
Now it’s time to adjust our Gate plugin. Start by setting the ‘Return’ knob and the ‘Floor’ knob to 0.00dB. This ensures that your audio recording drops to 0db whenever it is below the threshold.
To prevent any background noise from passing through the gate, adjust the ‘Threshold’ to sit directly above the volume of your background noise. Below you can see the background noise sitting underneath the blue threshold line, allowing all wanted audio sections to pass through the gate.
Lastly, setting a ‘Release’ time will ensure words and phrases end smoothly. Adjust this setting based on your audio recording but normally a release time of somewhere between 50-150ms should do the trick. Feel free to experiment with other parameters in order to get the best sounding result possible.
Step 4: Export
Once you are happy with how your audio is sounding , it’s time to export your recording. Firstly, highlight your recording in the arrangement view, then head to the File menu and press ‘Export’. Alternatively, you can press [COMMAND + Shift + R] on Mac or [CNTRL + Shift + R] on Windows.
Below is an example of the waveform of a voice recording before and after Gate has been applied.
Before:
After:

Your audio recording is ready to upload and distribute! If you would like to visualise the waveform of your recording after the Noise Gate has removed the background noise, simply import the exported recording onto an audio track in Ableton.
Want To Know More?
Here at Live Aspects, we have dozens of useful lessons and tutorials created to enhance your music production skills and help speed up the learning process. You can access our huge range of music theory lessons and production tips and tricks here.