The Arpeggiator is a MIDI tool that rhythmically cycles through the notes of a chord one after another in sequence. It comes with an array of different patterns designed to help you create unique monophonic melodies. The arpeggio is a popular music technique that can be identified in all genres of music.
Hi, I’m Ben from Live Aspects and in this tutorial, we’ll be learning how to use Ableton Live’s Arpeggiator plug-in and exploring each of it’s components.
- | Step 1: Create MIDI Track
- | Step 2: Add MIDI Instrument
- | Step 3: Create Chord Progression
- | Step 4: Add ‘Arpeggiator’
- | Arpeggiator Parameters
- | Arpeggiator Styles
Without further ado, let’s dive in!
| Step 1: Create MIDI Track
Start by creating a MIDI track. Simply head to the ‘Create‘ menu at the top of the Live window and select ‘Insert MIDI Track‘. Alternatively, you can press [COMMAND + Shift + T] on Mac or [CNTRL + Shift + T] on Windows.
| Step 2: Add MIDI Instrument
Next, add a MIDI instrument to your MIDI track. Choose from Live’s library of instruments and sounds or select one of your favourite external VST instrument plug-ins. Some of the most popular VST plug-ins include Serum, Massive, Sylenth1 and Nexus. You can access sounds, instruments and plugin-ins from Live’s browser.

| Step 3: Create Chord Progression
In this step, we’re going to create a chord progression. The Arpeggiator MIDI effect requires a set of held/sustained notes or chords in order to function.
Firstly, we need to create a MIDI clip. Left-click the arrangement view and drag to highlight the desired length of your MIDI clip. In this example, we’ll be creating a 4-bar chord progression.

Create a MIDI clip by right-clicking the highlighted region and selecting ‘Insert MIDI Clip(s)‘. Alternatively, you can create a MIDI clip by pressing [COMMAND + Shift + M] on Mac or [CNTRL + Shift + M] on Windows.
 Double-click on the top part of your MIDI clip to access the piano roll. Here you can pencil in a chord progression or record using a MIDI keyboard.

| Step 4: Add ‘Arpeggiator’
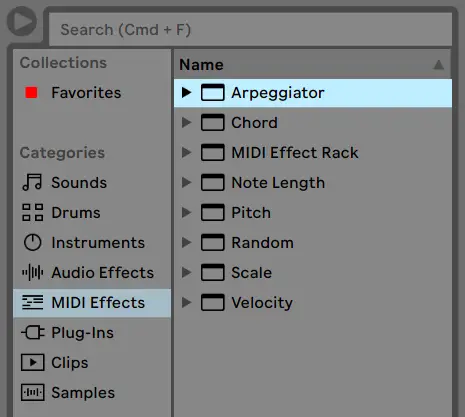
Head on over to the browser, select the ‘MIDI Effects‘ category and double-click on ‘Arpeggiator‘.
Finally, customize the settings of the Arpeggiator plug-in to create an arpeggiated melody from your chord progression. Start by selecting from the various arpeggiator patterns in the ‘Style‘ drop-down box.
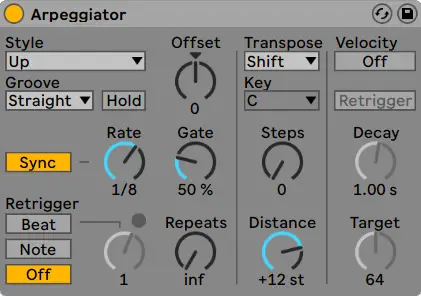
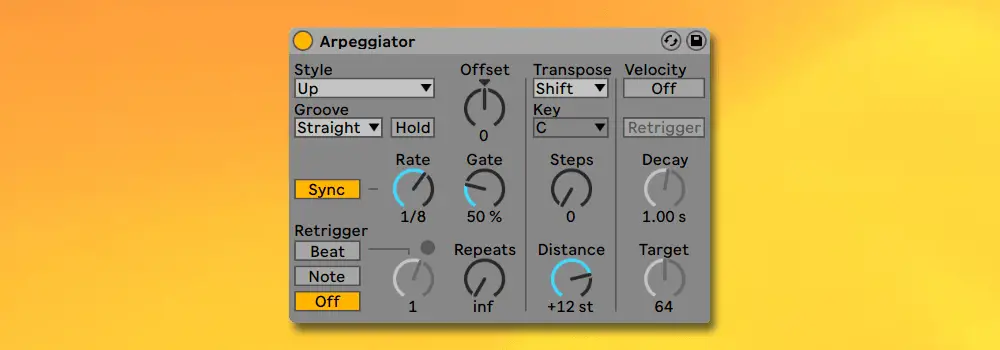
| Arpeggiator Parameters
Below is a list and description of the most commonly used parameters of Live’s Arpeggiator plugin:
Style: A selection of patterns where the notes of each chord are played in a particular arpeggiated sequence
Groove: Select whether your arpeggiated pattern is straight or swung
Rate: The speed at which Arpeggiator will play the sequence of notes
Sync/Free: Set the Arpeggiator rate to either a beat subdivision or a millisecond amount
Gate: Determines the length of each note within the arpeggiated pattern. A 100% gate means one note ends as the next begins. Settings above 100% result in legato playing
Offset: Decide which note of each chord the arpeggiator pattern begins on
Repeats: Specify how many times an arpeggiator pattern is repeated per chord
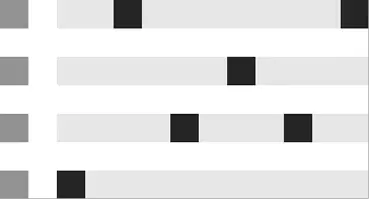
| Arpeggiator Styles
Below is a visual representation of each of the selectable styles the Arpeggiator has to offer:
‘Up‘ and ‘Down‘

‘UpDown‘ and ‘DownUp‘

‘Down & Up‘ and ‘Up & Down‘

‘Converge‘ and ‘Diverge‘

‘Con & Diverge‘
‘Pinky Up‘ and ‘Pinky UpDown‘

‘Thumb Up‘ and ‘Thumb UpDown‘

Want To Know More?
Here at Live Aspects, we have dozens of useful lessons and tutorials created to enhance your music production skills and help speed up the learning process. You can access our huge range of music theory lessons and production tips and tricks here.