One-shot samples inspire and stimulate producers to create professional sounding and unique electronic compositions. They are easy to use pieces of musical audio that can form the foundation of your next track.
Whether you’re looking for a groovy bassline, a solid drum groove, or some tasty vocal chops, one-shot samples can help you create or improve any aspect of your track.
I’m Ben from Live Aspects and I’ll be showing you exactly how to use one-shot samples to increase the quality of your Ableton productions.
- | What Is A One-Shot?
- | Ableton’s Simpler
- | Create An Instrument Using A One-Shot Sample
- | Create Drum Beats Using One-Shots
- | Create Realistic MIDI Drums
- | Using One-Shot To Create Vocal Chop Melodies
- | Create Your Own Loops
- | One-Shots In Arrangement View
Without further ado, let’s get started!

| What Is A One-Shot?
A one-shot sample is a single hit, note or chord. It can be any short piece of audio from a strike of a drum, a strum of a chord on an electric guitar or a vocal adlib.
One-shots have the capability of being the building blocks for your entire project. Sample Packs will often have folders strictly dedicated to one-shot samples.
| Ableton’s Simpler
Simpler is a versatile sampling instrument that comes free with each version of Ableton Live. It is the best way to playback, edit and manipulate one-shot samples and other audio.
Simpler is most commonly used to play one-shots or loops that can be processed by ADSR envelope, filter, LFO, volume, and pitch functions.
It gives you intuitive control over every detail of an audio sample and provides users with the ability to play an audio file on the notes of a MIDI keyboard or any other MIDI device.
Below we’ll be exploring some of its amazing features and explaining the best way to use one-shot samples in Simpler:
| Drag & Drop
The Simpler interface has a simple drag & drop area that allows you to place any audio file in to begin editing and creating.
If you’re not happy with the one-shot you’ve selected or simply want to experiment with another, swap out your sample on the fly by accessing your one-shot libraries directly within Ableton or dropping audio in from Session or Arrangement view.

| Warping
At times, you’ll run into a one-shot sample that you wish retained its length when played at different pitches.
You will find that the higher you play a MIDI note, the shorter the sample becomes while playing a MIDI note lower than the sample’s original pitch, the sample becomes longer.
Audio samples playback at different speeds when different pitches are played from a Simpler device. This poses a problem when creating melodic layers such as a bassline or a chord progression.
There’s a fantastic feature in Ableton’s Simpler that allows the length of a one-shot sample to be retained when played at any pitch. It works by using Ableton’s Warp function.
The Complex and Complex Pro warp options provide a natural sounding transposition / time stretching.
Keep in mind that these two algorithms demand more CPU and might slow down your Ableton’s performance when used in a large, intricate project so use sparingly wherever possible.

| Slice Mode
If you’ve heard a loop that you enjoyed elements of or simply think a drum beat could be played differently, Simpler has a fantastic slicing feature that allows a loop to be broken down into individual one-shot samples for creative experimentation.
It works by detecting the transients of a loop and dividing your sample onto ascending MIDI notes, giving you the ability to trigger each of the new one-shot slices individually.
This gives you the potential to have instant access to an entire drum kit, reorder the words of a spoken phrase or change the sequence and rhythm of a chord progression. Your options are endless with Simpler’s slice mode.

| Create An Instrument Using A One-Shot Sample
If you like the sound of a particular one-shot and wish you could play it across the different notes on your MIDI keyboard, Simpler makes it possible to turn a single one-shot sample into a fully functioning MIDI instrument.
Follow these six steps to create an instrument using one-shot samples:
1. Select A One-Shot
Find a one-shot sample that you would like to be able to play as an instrument. This could be anything from a single piano note to a vocal phrase or word. Next, drag & drop your sample into Simpler.
Ensure that you have ‘Classic’ mode selected. Classic mode works by pitching a sample across the keyboard so you can play it as an instrument.

2. Create A Sustain
We are going to create a short loop within your chosen one-shot in order to create a sustain. This step makes it possible for the sound of your one-shot sample to continue for as long as you hold down a note.
Start by selecting ‘Loop’ directly below your one-shot’s waveform. Adjust the ‘Start’, ‘Loop’ and ‘Length’ values to loop a region of your one-shot that is stable and does not descend in volume.

3. Adjust The Fade
Adjust the ‘Fade’ value until your one-shot sounds like it is sustaining rather than looping. The ‘Fade’ feature removes the clicks you hear each time the one-shot loops and makes the sustain sound smooth.
Often a smaller loop region will create a better sounding sustain tone.

4. Add Release Time
Release ensures that your instrument does not abruptly conclude when you let go of a MIDI key. Adjust the ‘Release’ value to create a short fade out upon the conclusion of a MIDI note.

5. Tune Your Instrument
If you intend on using your new instrument with other harmonic and melodic sounds, it’s important to adjust the pitch of your one-shot so it is in tune.
This step is especially important when your sample does not have a defined pitch. First, add Ableton’s ‘Tuner’ audio effect. Make sure the note being displayed on the Tuner matches the note you’re playing on your MIDI device.
Select the ‘Control’ tab then adjust the ‘Transp’ option until these two values match. If your instrument is sharp or flat, adjust the ‘Detune’ value until your instrument is in tune.

6. Start Creating
Your instrument is now complete! Play your favourite chord progressions and record to MIDI.
| Create Drum Beats Using One-Shots
| Drum Rack Technique
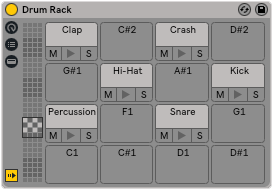
Using Ableton’s Drum Rack is the easiest way to play your selection of multiple one-shots on your MIDI device. This CPU-friendly tool features dozens of pads, each which can store a single one-shot and be triggered by your MIDI device.
Drum Racks display each of your one-shots in the piano roll of your track’s MIDI clips. Drawing in beats, recording your MIDI performances and editing single drum hits are just some of the capabilities of this extraordinary tool.
The following three steps will help you create drum beats using Ableton’s Drum Rack:
1. Collect A Variety Of Drum One-Shots
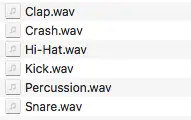
Search your sample packs and create a drum kit of one-shot samples. A kick, clap, snare, hit-hat, crash cymbal and some percussion is all you need to create the perfect drum beat.

2. Add A Drum Rack To A MIDI Track
Drag & drop each of your samples onto individual slots on the drum rack. Renaming your one-shots can make it easier to identify where each sample is placed on your drum rack.

3. Start Creating
Plug in your MIDI device and find the octave where your samples are located. Each of your one-shots will have their own dedicated MIDI note. Create a MIDI clip and draw in your drum beat or record using your MIDI device.
| Slice Mode Technique
Using Simpler’s Slice Mode is a quick way to make drum beats on your MIDI device.
This mode enables you to load a loop into the sampler and have it automatically chopped at it’s transients. The drag & drop feature gives you the ability to easily and quickly change the sound of your drum slices.
Follow these four steps to create drum beats using Simpler’s Slice Mode:
1. Choose A Drum Loop
Search your sample packs for a drum loop you like the sound of. Select ‘Slice’ on the left side of the Simpler interface then drag & drop your sample into Simpler.
Make sure to select your preference of Warp mode but generally, ‘Beats’ mode works best for drums.

2. Adjust The Sensitivity
If you want to change the number of slices made from your drum loop, you can adjust the sensitivity of the slice algorithm.
By reducing the sensitivity, you increase the size of each slice and reduce the number of slices. You can adjust this value below the waveform of your drum loop.

3. Playback Options
‘Trigger’ plays back the slice in its entirety while ‘Gate’ plays the slice for as long as you press a key on your MIDI device. If you want to be able to play multiple slices at one time, be sure to change the ‘Playback’ option to ‘Poly’.

4. Start Creating
Plug-In Your MIDI Device and start creating with your new drum kit.
You can now play these slices in a completely different order than the original drum loop sample. Be sure to experiment with the other amazing features of Simpler.
| Create Realistic MIDI Drums
Recording live drums can be a costly procedure and many producers often don’t have access to a drum kit and expensive recording equipment.
With a bit of practice and know-how, you can use one-shot samples to create realistic sounding MIDI drums. The following tips help mimic the imperfections of a real drummer:
| Velocity
Velocity is the volume at which a specific MIDI note is played. By varying the velocity of your one-shots throughout your MIDI clips, you can make your beats sound more natural and real sounding.
For the drum hits you wish to accent, keep the velocity high. Similarly, be sure to reduce the velocity on non-accented drum hits. You can view and adjust the velocity of your MIDI notes at the bottom of your MIDI clips.

| Quantization
Another way to make your drums sound more realistic is to avoid quantizing your MIDI clips or drawing your beats to the grid. Quantization will make your MIDI sound perfectly in time but can cause your beats to sound robotic.
Instead of quantizing, try moving some notes slightly ahead or behind the grid. Using a MIDI instrument will naturally vary the timing and the volume of the notes, making your track sound significantly more realistic.

| Selecting The Right Samples
To achieve realistic-sounding electronic drums, it’s important to select one-shots that are either live recordings or sound realistic to begin with.
Sample packs will sometimes provide producers with drum kits that contain one-shots that work harmoniously in a drum rack. Avoid using clearly electronic sounding drums and instead, search your sample packs for live-sounding one-shots.
| Using One-Shots To Create Vocal Chop Melodies
1. Find A Vocal Phrase/One-Shot
Search your sample packs for a vocal phrase or a one-shot and listen for vowels like “A”, “E”, “I”, “O” and “U”.
Move the start flag to adjust where in the sample playback begins. Next, make sure to click ‘Warp” to disable warping.

2. Turn On Glide
Firstly, set the Voices value to ‘1’. Next, head to the Controls tab, click the ‘Glide’ drop-down menu then select the ‘Glide’ option.
Vary the ‘Time’ value to adjust the speed of the glide between notes. Play overlapping notes on your MIDI device to preview this effect.
Finally, return to the Sample tab and drag the finish flag to where you want your vocal chop to conclude.

3. Tune Your Vocal
Add Ableton’s ‘Tuner’ audio effect. Make sure the note being displayed on the Tuner matches the note you’re playing on your MIDI device.
Select the ‘Control’ tab then adjust the ‘Transp’ option until these two values match. If your vocal is sharp or flat, adjust the ‘Detune’ value until your vocal is in tune.

4. Sidechain, Saturation, EQ & Reverb
This step is all up to you! Try adding some additional effects plugins to strengthen the sound of your new vocal chops. Saturation will give your vocal more color while reverb will give it more space.
Make sure to remove the low frequencies using an EQ and use sidechain compression to leave room for your kick drum.
5. Start Creating
Try to incorporate overlapping notes to make use of the Glide feature when recording MIDI and writing in the piano roll.
| Create Your Own Loops
If you’ve created something great but it just doesn’t quite suit the direction you were heading in, you can quickly and easily turn your ideas into loops for future use.
Simply select the region of the clip you’ve made on arrangement view, solo the track and export as an audio file. Build your own sample packs using this technique or send your loops to your producer friends to see their take on your original ideas.
| One-Shots In Arrangement View
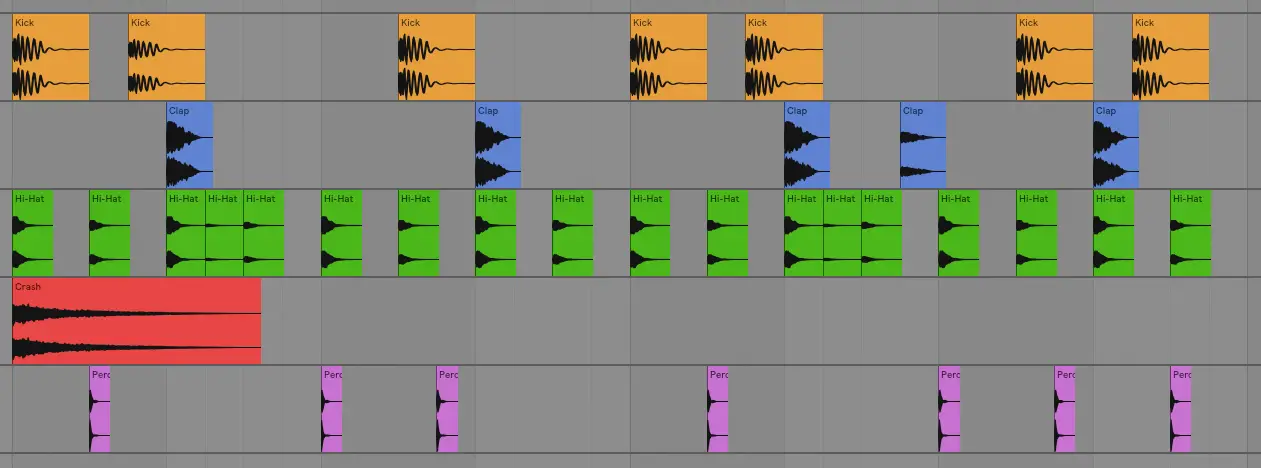
If you prefer working with the parameters of audio clips instead of MIDI clips, try inserting your one-shot samples directly onto audio tracks in Ableton’s Arrangement View.
This method makes it possible to apply effects plugins to a single or set of one-shots on an audio track. Some producers favour the ability to visualise the waveform of audio when making creative decisions.
Below is an example of a drum beat where a variety of drum shots are placed on different audio tracks for individual processing:

Ableton’s amazing set of tools makes it easy to turn a one-shot sample into your next big hit.
See the potential in every one of your one-shot samples and feel confident knowing you know have the ability to turn them into something remarkable.
If you need a collection of high-quality bass one-shot samples, you can download 50 Bass One-Shots here.
Want To Know More?
Here at Live Aspects, we have dozens of useful lessons and tutorials created to enhance your music production skills and help speed up the learning process. You can access our huge range of music theory lessons and production tips and tricks here.