Nudging can be used to make small adjustments to the timing of your regions, as well as rhythmically move regions around the Logic Pro workspace. Whether you’re looking to move a MIDI recording, a vocal sample or an entire track, nudging is a clever tool that can speed up workflow and help you build your Logic projects more efficiently.
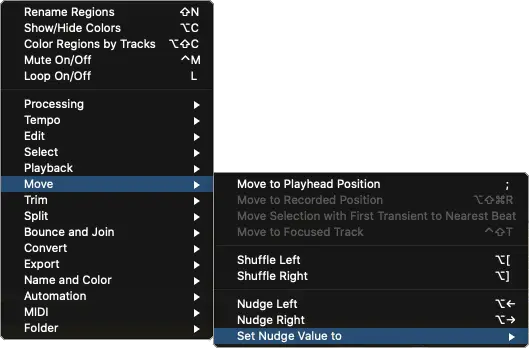
To nudge a region in Logic Pro, left-click on the region you would like to nudge then hold the [OPTION] key and press the left and right arrow keys. You can change the value by which regions are nudged by right-clicking a region and selecting from the options under Move > Set Nudge Value to.
Hi, I’m Ben from Live Aspects and in four easy steps, I’ll show you exactly how to nudge a region in Logic Pro.
- Step 1: Open Logic Pro
- Step 2: Create Or Import Region
- Step 3: Set Nudge Value
- Step 4: Nudge Track
Without further ado, let’s get started!

Step 1: Open Logic Pro
To nudge a region in Logic Pro, start by opening the software. Create a new project or open an existing one.
![]()
Step 2: Create Or Import Region
Import or select the region you would like to nudge. Both Audio and MIDI regions can be nudged.

Step 3: Set Nudge Value
Next, we need to determine how regions will be nudged by setting the nudge value. Right-click a region then select Move > Set Nudge Value to.

Here you will find the various nudge options including tick, division, beat, bar and frame. The most popular nudge values are accompanied by a keyboard shortcut and can be found on the list below.

Step 4: Nudge Region
Lastly, left-click your region then hold down the [OPTION] key and use the left and right arrow keys to nudge it. Alternatively, you can right-click your region and select Move > Nudge Left/Right.

FAQ | What Are Regions In Logic Pro?
Regions are the building blocks of a Logic Pro project. Regions appear as colored, rounded rectangles in the Tracks area. Audio and MIDI regions are the two types of regions.
FAQ | How Do I Move Multiple Regions In Logic?
To move multiple regions in Logic Pro, first highlight them by either dragging the cursor over several regions, or by clicking on each region while holding the [SHIFT] key. If you move one of the highlighted regions, they will all move in unison. You can also nudge them by pressing [OPTION] + Left/Right.
FAQ | How Do I Change The Nudge Value In Logic Pro?
To change the nudge value in Logic Pro, right-click a region then select Move > Set Nudge Value to. Here you will find a variety of nudge options including tick, division, beat, bar and frame.
Related Posts:
How To Update Logic Pro
How To Fade In Logic Pro X
Top 10 Artists That Use Logic Pro
Want To Know More?
Here at Live Aspects, we have dozens of useful lessons and tutorials created to enhance your music production skills and help speed up the learning process. You can access our huge range of music theory lessons and production tips and tricks here.