There is no worse feeling than witnessing Ableton Live crash while working on an unsaved project. You’ve just spent hours creating a masterpiece and Live has crashed before you had a chance to click save. Whether you’re new to Ableton Live or already familiar with the software, it’s possible you have experienced an Ableton Live crash. Fortunately for Live users, there is a very simple way to recover a project after an unexpected crash.
Hi, I’m Ben from Live Aspects and in this guide, I’ll be revealing the best way to recover an Ableton Live project after a crash.
- | Step 1: Locate Ableton Live Crash Folder
- | Step 2: Locate Project Recovery Files
- | Step 3: Remove Dates From File Names
- | Step 4: Move Files To Parent Folder
- | Step 5: Reopen Ableton Live
Without further ado, let’s get started!

| How To Recover An Ableton Live Project
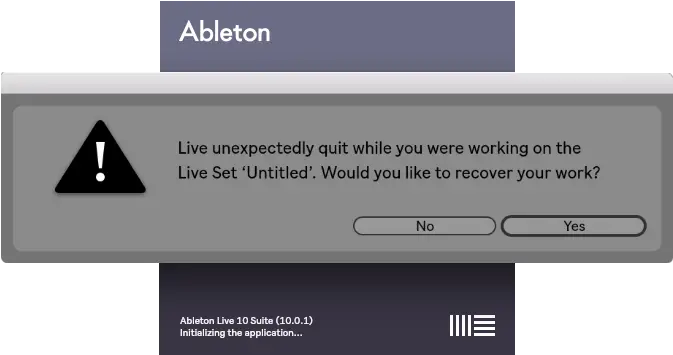
When first reopening Live after a crash, you will be faced with a window asking if you would like to recover your work. To recover an Ableton Live project, simply reopen Live and select ‘Yes’ from the restore document dialog window. All elements of your previously unsaved project should reappear.

| Manually Recover An Ableton Project
If you accidentally pressed ‘No’ from the restore document dialog window or Live failed to prompt it, there is a way to manually recover your project. Completing the following five steps will cause Ableton to re-trigger the restore document dialog window so you can recover your project. Manual project recovery needs to be completed using the same version of Ableton Live you were using when the crash occurred.
| Step 1: Locate Ableton Live Crash Folder
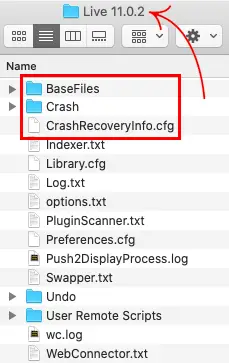
To manually recover an Ableton project, start by locating the Crash folder of your project. Open Finder/File Explorer and navigate to the following folder:
Windows:
Users\[Username]\AppData\Roaming\Ableton\Live x.x.x\Preferences\Crash\
Mac:
Users/[Username]/Library/Preferences/Ableton/Live x.x.x/Crash/
If you are having trouble finding the Crash folder, it’s possible it may be hidden. To reveal hidden folders on Mac, simply press [COMMAND + Shift +.]. For Windows devices, click ‘Options’ from the View tab, choose View, select ‘Show hidden files, folders, and drives’ and then click OK.

| Step 2: Locate Project Recovery Files
Locate the following three files: Base Files, Crash Recovery and Undo. If Live has crashed more than once, there may be multiple sets of these files, each named with their date and time of crash. Make sure to select the files with the date and time of the crash you wish to recover.
• Base Files
• Crash Recovery Info
• Undo
| Step 3: Remove Dates From File Names
Rename each of the three files and remove the date and time from their titles. You can do this by left-clicking each file and pressing [COMMAND + R] on Mac or [F2] on Windows.

| Step 4: Move Files To Parent Folder
Lastly, move each of the three files into the ‘Live x.x.x’ folder. Simply copy each of the three files, head back to the parent folder and paste. If a dialog box appears, select ‘Replace’ for each file.

| Step 5: Reopen Ableton Live
It’s time to reopen Ableton Live! Once open, select ‘Yes’ from the restore document dialog. Live will now restore your Ableton project.

Related Posts:
How To Authorize Ableton Live Offline
Can’t Hear Ableton Playback? Here’s How To Solve It
How To Send Ableton Live Projects
Want To Know More?
Here at Live Aspects, we have dozens of useful lessons and tutorials created to enhance your music production skills and help speed up the learning process. You can access our huge range of music theory lessons and production tips and tricks here.
