If you record anything in Ableton, then you’ll need to know about Live’s metronome. Metronomes are an extremely helpful tool when it comes to performing and recording.
I’m Ben from Live Aspects and I’ll be showing you the ins and outs of the metronome in Ableton and how to optimize its use in your productions. We’ll be covering all aspects of Live’s metronome so without further ado, let’s get started!
- | What Is A Metronome?
- | How To Use Ableton’s Metronome
- | Change The Metronome Sound
- | Customize The Metronome Sound
- | Change The Metronome Volume
- | Change The Metronome Rhythm
- | How To Set A Count-In
- | How To Automate Tempo
- | Route Metronome To Headphones Only
| What Is A Metronome?
A metronome is a device used to keep steady time when performing or recording music. It is an audible representation of tempo measured in beats per minute (BPM) that helps you determine how fast or slow your project is.
Using a metronome while recording ensures your performance stays in time with the other elements of your track. Keeping in time with your project’s tempo reduces timing errors in your recordings and will save you valuable time.
Ableton contains a completely customizable metronome to allow users to record instrumental layers in time with the other elements of their project.

| How To Use Ableton’s Metronome
You can access Live’s metronome at the top left of your project in the Top Bar. Toggle the metronome on and off by clicking the icon. Yellow indicates the metronome is active while grey means it is muted.
![]()
The arrow on the right side of the icon opens a drop-down menu with a variety of options. You can customize the metronome using the ‘Count-In’, ‘Sound’ and ‘Rhythm’ categories. We’ll be covering each of these options later in this guide.
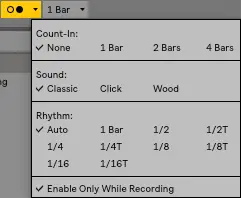
The ‘Enable Only While Recording’ function saves you the hassle of turning the metronome on and off when recording. Recording is when producers most commonly use the metronome so it is recommended to turn this option on if your project requires recording.
| Change The Metronome Sound
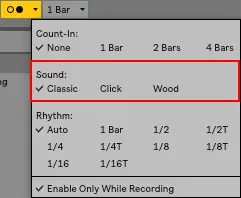
Live offers several options for the sound of your metronome. Start by accessing the drop-menu on the right side of the metronome icon. Under the ‘Sound’ category, select from one of the three sound options: ‘Classic, ‘Click’, or ‘Wood’.
The ‘Classic’ option offers a bright and tonal sounding metronome while the ‘Wood’ provides a similar, more woodblock-like sound. Try selecting the ‘Click’ option for a more gentle metronome sound.
| Customize The Metronome Sound
If you are looking for a metronome sound other than Live’s options, you will need to dig into Live’s files in order to install your own. Begin by finding two audio files, one to signify beat one of each bar and another for the remaining beats.
| Mac
To customize the sound of the Metronome in Ableton on Mac, follow the below steps:
Step 1: Open Finder, navigate to the Live application then right-click and select ‘Show Package Contents’.
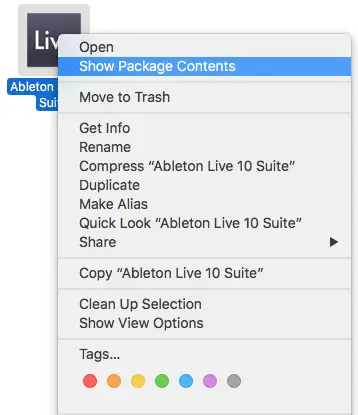
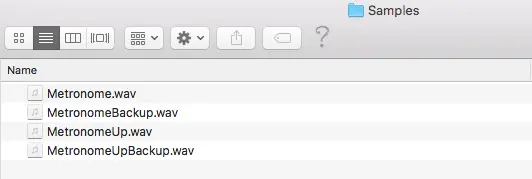
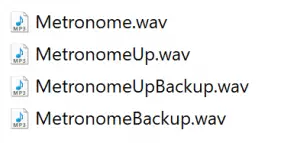
Step 2: Open ‘Contents/App-Resources/Misc/Metronome/Samples/’ and find the files “Metronome.wav” and “MetronomeUp.wav”.

Step 3: Rename your “MetronomeUp.wav” and “Metronome.wav” to “MetronomeUpBackup.wav” and “MetronomeBackup.wav”. Keep these files if you want to change them back later.

Step 4: Rename your custom Metronome sounds to “Metronome.wav” and “MetronomeUp.wav” and paste them into the folder mentioned above. If you wish to use the original Metronome sounds, delete your custom sounds and rename the backup files by removing “Backup” from the names.
| Windows
To customize the sound of the Metronome in Ableton on Windows, follow the below steps:
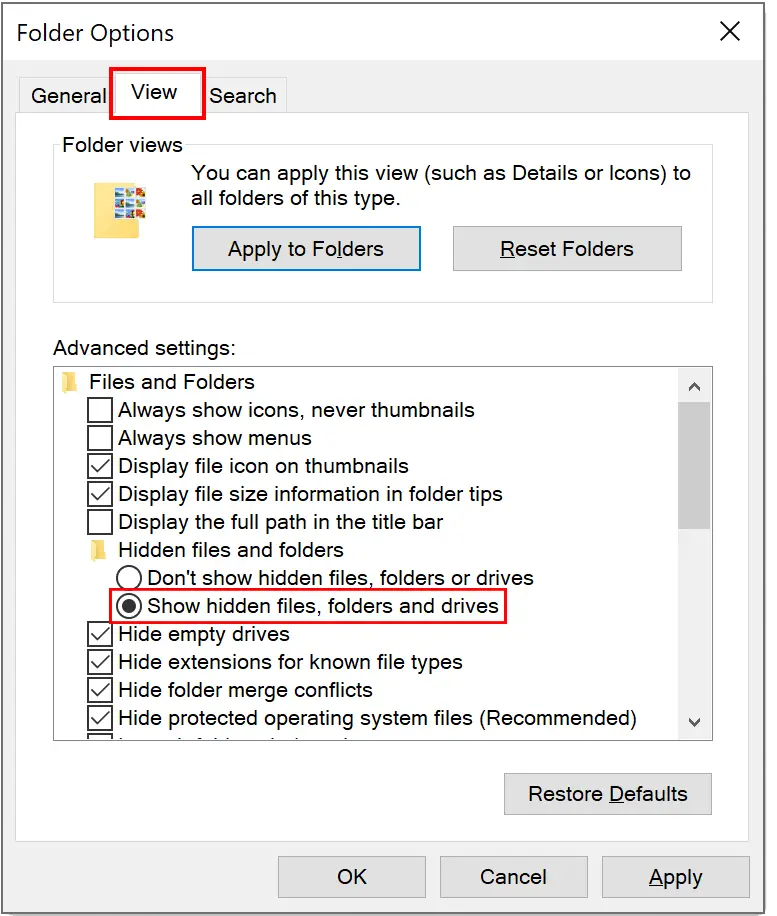
Step 1: Open File Explorer/Windows Explorer, click ‘View’ then select ‘Options’. In the Folder Options window, choose ‘View’ select ‘Show Hidden Files, Folders and Drives’ then click ‘OK’.
Step 2: Navigate to the folder ‘C:\ProgramData\Ableton\Live x\Resources\Misc\Metronome\Samples\’ and find the files “Metronome.wav” and “MetronomeUp.wav”.

Step 3: Rename your “MetronomeUp.wav” and “Metronome.wav” to “MetronomeUpBackup.wav” and “MetronomeBackup.wav”. Keep these files if you want to change them back later.

Step 4: Rename your custom Metronome sounds to “Metronome.wav” and “MetronomeUp.wav” and paste them into the folder mentioned above. If you wish to use the original Metronome sounds, delete your custom sounds and rename the backup files by removing “Backup” from the names.
| Change The Metronome Volume
Perhaps you’re struggling to hear the timing of the metronome when trying to record audio. Maybe the metronome is overpowering certain sections of your project. Fortunately, Ableton makes it easy to change the volume of the metronome.
The volume of Live’s metronome is controlled by a knob located on the Master track. It contains a small headphones icon and sits underneath the panning knob.

| Change The Metronome Rhythm
By default, Ableton’s metronome plays on each beat with an alternate sound specifying the first beat of each bar. Changing the rhythm of Live’s metronome is simple.
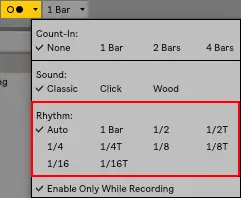
First, access the drop-menu on the right side of the metronome icon. Navigate to the ‘Rhythm’ category and select which rhythm you would like the metronome to play. The metronome is automatically set to ‘Auto’ rhythm which plays a ¼ note rhythm.
| How To Set A Count-In
A Count-In informs performers of the tempo they are required to play at before recording begins. It helps musicians come in on time when recording starts.
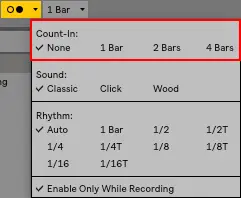
To set a count-in, start by accessing the drop-menu on the right side of the metronome icon. Navigate to the ‘Count-In’ category and select the duration of the count-in. You can select between a 1, 2 or 4 bar count-in.
Be sure to inform the performer of the setting you have selected so they are aware of how long to wait before recording begins.
| How To Automate Tempo
Tempo automation allows for a gradual or sudden change in tempo at certain points in your track. If you’re looking to speed up or slow down sections of your project, follow these four steps:
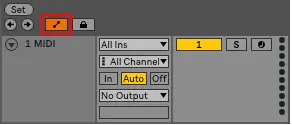
Step 1: View Automation Envelope
To view and edit automation envelopes in the arrangement view, activate Automation Mode by selecting the toggle icon above your first track or by pressing the ‘A’ key.
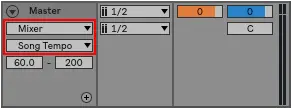
Step 2: Access Song Tempo Automation
Navigate to your project’s Master track and select ‘Master’ in the first drop-down menu then select ‘Song Tempo’ in the second drop-down menu.
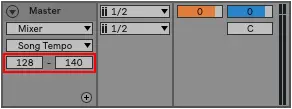
Step 3: Set The Tempo Range
Set your desired minimum and maximum tempo parameters.
Step 4: Create Automation
Set automation points and create your automation envelope. You have now automated the tempo of your project.

| Route Metronome To Headphones Only
If your sound card/audio interface has multiple outputs, Live’s metronome can be routed to a second output using the ‘Cue Out’ output on your project’s Master Track.
This technique is useful in situations when the metronome doesn’t need to be heard through the main output such as through a performer’s headphones when recording into Live.
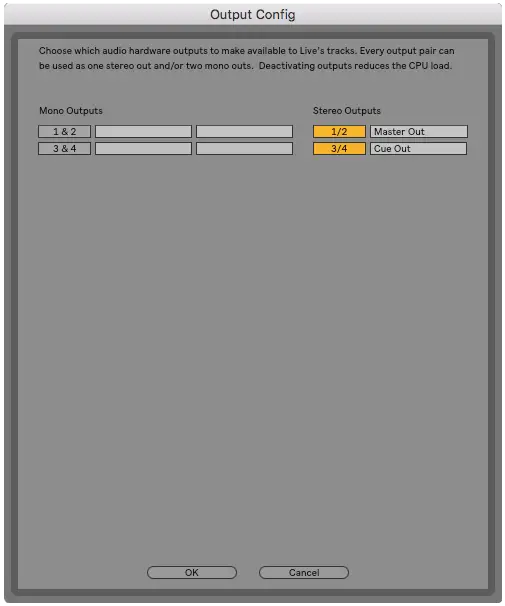
Step 1: Enable Second Output
Open ‘Preferences’ and under the ‘Audio’ tab, select ‘Output Config’. Next, enable the extra stereo output(s). You can rename each of the outputs if you would like to.
Step 2: Route The Cue Out
Select the ‘I/O’ icon to the right of your Master track. Next, route the ‘Cue Out’ on the Master track to your secondary output. This includes the output of the metronome.

Step 3: Adjust The Volume
The metronome will now be heard from your second output. Adjust the volume of the metronome using the blue knob on the Master track.

Want To Know More?
Here at Live Aspects, we have dozens of useful lessons and tutorials created to enhance your music production skills and help speed up the learning process. You can access our huge range of music theory lessons and production tips and tricks here.