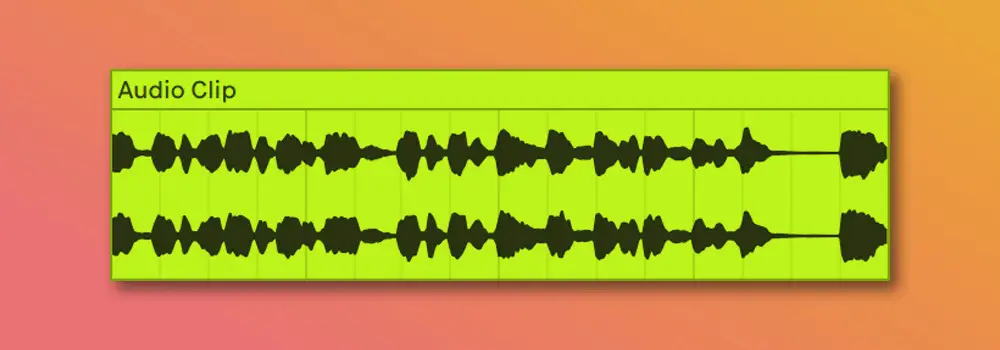
From vocal recordings to drum loops, audio clips make up a large portion of any Ableton project. They are one of just two clip types that can be used to build an arrangement in Ableton. Live contains an array of extraordinary tools and commands designed to inspire editing audio in unique ways. Optimize your Ableton experience and improve the quality of your productions by learning how to edit audio in Ableton Live.
Hi, I’m Ben from Live Aspects and in this blog, we’ll be exploring the many ways to edit audio in Ableton Live. Below is a list of topics we’ll cover:
- | Importing Audio
- | Editing An Audio Clip
- | Warping Audio
- | How To Reverse Audio
- | How To Change Pitch
- | Adding Audio Effects
- | How To Slice Audio To MIDI
- | How To Convert Audio To MIDI
Without further ado, let’s dive in!
| Importing Audio
To edit audio in Ableton Live, we first need to import an audio sample. Simply drag and drop an audio file from Finder/File Explorer or Live’s Browser onto an audio track in Session or Arrangement View. If you’re importing multiple audio files, hold down [COMMAND] on Mac or [CTRL] on Windows to place each file onto its own audio track. Ableton supports a variety of audio formats including WAV, AIFF, FLAC, OGG, MP3, and M4A/MP4.

| Editing An Audio Clip
Live’s clip editing functionalities can be executed in Arrangement View. To toggle between Sessions View and Arrangement view, simply press [TAB] on your keyboard.
| How To Slice
To slice a portion of an audio clip, highlight the region of an audio clip that you would like to remove and press [DELETE] on your keyboard.

| How To Split
To split an audio clip, click the beat|bar where you want to split the clip and press [COMMAND + E] on Mac or [CNTRL + E] on Windows.

| How To Crop
To crop an audio clip, start by hovering your mouse over the top left or top right corner of the audio clip. Once your cursor becomes a crop symbol, simply left-click and drag left or right to crop the clip.

| How To Fade In & Out
Fading an audio clip in or out can be achieved using the fade handles. Fade handles appear as small square boxes in the corners of an audio clip. Simply hover over an audio clip with your mouse to reveal the fade handles, then click and drag left or right to create a fade. You can change the shape of the fade by adjusting the diamond-shaped fade handles.

| How To Crossfade
To create a crossfade, start by placing two adjacent or overlapping audio clips in arrangement view. Alternatively, you can split a single audio clip. Finally, left-click and drag the fade handles in the top corners of the connected clips. Use the curve handle between the fade handles to adjust the shape of the crossfade.

| Warping Audio
Ableton Live’s Warp function gives you the ability to manipulate audio in exciting ways. Warping an audio clip allows you to play any sample in sync with a chosen tempo and manually quantize audio. You can also change the tempo of any audio clip without affecting its pitch.
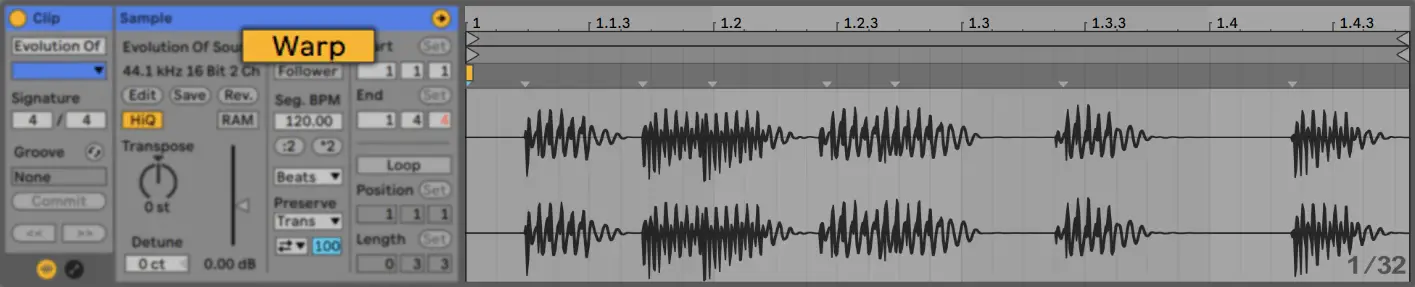
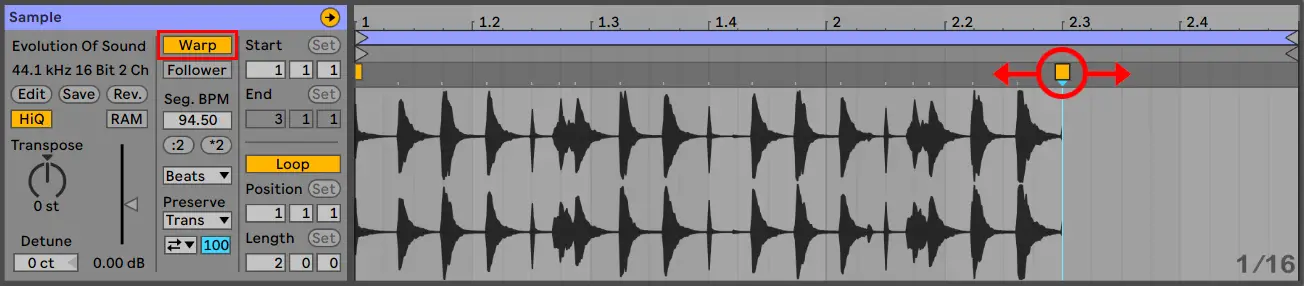
| How To Warp Audio
To warp an audio sample, open the Clip View by double-clicking on the top part of your audio clip in arrangement view. Simply navigate to the clip’s properties on the left side of Clip View and select the ‘Warp’ button.
Live will automatically estimate the original tempo of the sample in order to accurately sync it to the master tempo. If Live has incorrectly warped your sample, simply type its original tempo into the ‘Seg. BPM’ box below the ‘Warp’ button.
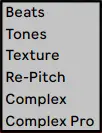
| Warp Modes
• Beats Mode is best for rhythmic audio samples such as drum loops, beats or percussion
• Tones Mode is recommended for distinctly pitched audio such as vocals, bass-lines and other monophonic instruments
• Texture Mode works best for textured sounds without a distinct pitch such as noise, atmospheric pads and other polyphonic audio
• Re-Pitch Mode stretches audio by adjusting pitch, similar to a vinyl record. Adjusting the master tempo or Segment BPM will alter the pitch of any audio in Re-Pitch warp mode
• Complex Mode works best for audio with a lot of character such as entire songs or multi-layered audio
• Complex Pro Mode offers better sounding results than Complex Mode but requires more CPU load
| Warp Markers
Warp Markers are used to manually stretch locations of a sample and lock points of a sample to the grid. They allow you to create specific rhythm and timing changes to sections of a sample.
Create a warp marker by double-clicking anywhere on the clip view or by double-clicking one of the grey pseudo warp markers above the sample’s waveform. Pseudo warp markers are automatically placed at each transient within your sample.
Warp Markers can be moved to different points on the grid by clicking and dragging or using the arrow keys on your keyboard. Holding [Option/Alt] while adjusting a Warp Marker will temporarily disable the grid and allow for a more precise placement.

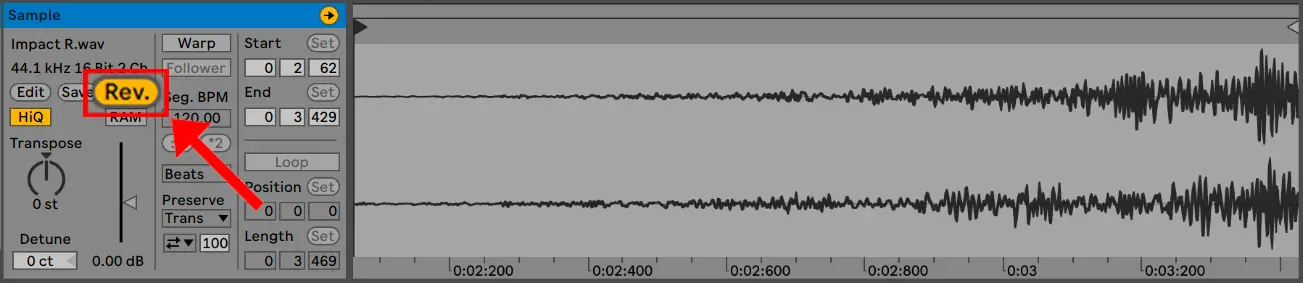
| How To Reverse Audio
To reverse an audio sample, open the clip view by double-clicking on the top part of an audio clip. Navigate to the left side of the clip view and select the ‘Rev.’ button. Alternatively, single-click on the top part of an audio clip and press ‘R’ on your keyboard.
| How To Stretch Audio
To stretch an audio sample in Ableton Live, start by double-clicking the top part of an audio clip to open clip view. Next, enable warp mode by selecting the ‘Warp’ button to the left of the waveform. Lastly, click and drag the yellow warp marker at the end of the waveform to stretch the audio sample. Hold down [OPTION\ALT] while dragging the warp marker to temporarily disable the grid.
| How To Change Pitch
To change the pitch of an audio sample, open the clip view by double-clicking on the top part of an audio clip. On the left side of the clip view, adjust the ‘Transpose’ knob to transpose in semitones. For a more fine-tune pitch adjustment, left-click the ‘Detune’ box and drag up or down to change the pitch in cents.
![]()
| Adding Audio Effects
Audio effects are used to manipulate and enhance audio samples. Live comes with an incredible selection of audio effects, allowing you to edit audio in almost an infinite amount of ways.
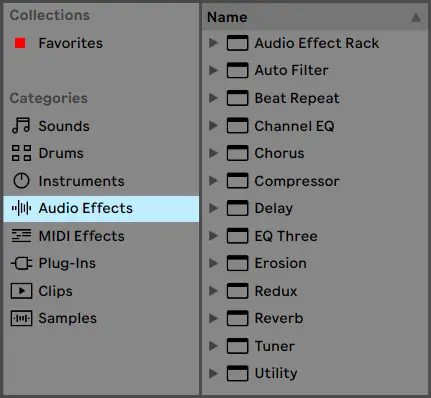
To use audio effects, start by navigating to Live’s Browser. To reveal the Browser, simply press [COMMAND + Option + B] on Mac or [CNTRL + Alt + B] on Windows. Next, select the ‘Audio Effects’ tab and choose which audio effect you would like to add to your audio track. Finally, double-click on the plugin to add it to a new/selected audio track or simply drag & drop it onto an existing audio track. You can now modify the parameters of your chosen audio effect in the Device Window.
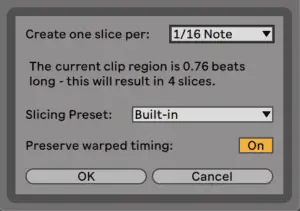
| How To Slice Audio To MIDI
The ‘Slice Audio To MIDI’ command divides an audio sample into smaller portions and assigns each slice onto its own MIDI note. This function is perfect for creating vocal chops or simply triggering portions of an audio sample using a MIDI device.
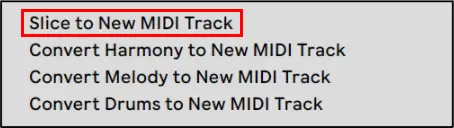
To slice an audio sample to MIDI, simply right-click on the top part of an audio clip and select ‘Slice to New MIDI Track’. You will be prompted with a new window where you can decide the number of slices, as well as the slicing preset. Upon selecting ‘OK’, Live will create a new MIDI track with a Drum Rack containing one chain per slice. A MIDI clip will contain each slice in a ‘staircase’ pattern which can be edited by double-clicking on the top part of the clip.
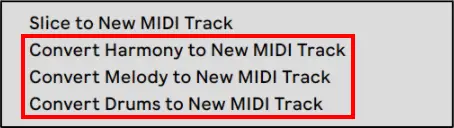
| How To Convert Audio To MIDI
The ‘Convert Audio to MIDI’ command allows you to extract the melodic, harmonic or rhythmic content of an audio sample and convert it to MIDI. This function makes it possible to convert samples, loops or your own recordings into MIDI notes.
To convert an audio clip to MIDI, simply right-click on the top part of an audio clip and select from the different convert to MIDI options. Once your audio has been converted to MIDI, you can add your desired instrument plugin and MIDI effects, as well as edit the MIDI pattern.
• For polyphonic audio (eg. chords played by a piano or synth), select ‘Convert Harmony to New MIDI Track’.
• For monophonic audio (eg. a recording of yourself singing), select ‘Convert Melody to New MIDI Track’.
• For unpitched rhythmic audio (eg. drums or percussion), select ‘Convert Drums to New MIDI Track’.
For more information on converting audio to MIDI, read chapter 12 of Live’s manual here.
Edit Audio
Want To Know More?
Here at Live Aspects, we have dozens of useful lessons and tutorials created to enhance your music production skills and help speed up the learning process. You can access our huge range of music theory lessons and production tips and tricks here.