Tape stopping is a popular effect utilised in many genres of electronic dance music. A tape stop effect is essentially a rapid descent in pitch that concludes with an immediate return to normal pitch. While there are a number of external tape stop plugins available, Ableton Live has made it possible to create a tape stop effect without needing to use any plugins. The technique used in this tutorial involves automating the transposition envelope directly within the clip view of an audio clip.
Hi, I’m Ben from Live Aspects and in six easy steps, I’ll be explaining the best and most efficient way to create a tape stop effect in Ableton Live.
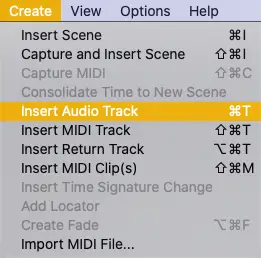
- | Step 1: Create Audio Track
- | Step 2: Import Audio
- | Step 3: Enable Warp Mode
- | Step 4: Show Envelopes Box
- | Step 5: Choose Clip Device & Transposition Control
- | Step 6: Automate Transposition
Without further ado, let’s dive in!
| Step 1: Create Audio Track
To create a tape stop effect, start by inserting a new audio track into your session. To create an audio track, navigate to the Create menu at the top of your screen and select Insert Audio Track. Alternatively, press [COMMAND + T] on Mac or [CNTRL + T] on Windows.
Skip to step 3 if your project already contains audio that you would like to tape stop.
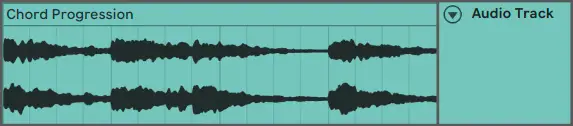
| Step 2: Import Audio
Navigate through your library of samples in Live’s Browser or Finder/File Explorer and locate the loop or song you would like to add a tape stop effect to. Next, drag and drop it onto your audio track in arrangement view.
If you are looking to add a tape stop effect to a MIDI clip, you will need to convert it to audio. You can do this by right-clicking on the MIDI track name and selecting Freeze, then right-clicking it again and selecting Flatten.
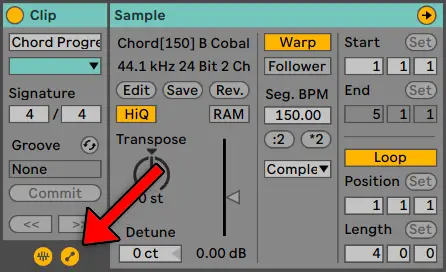
| Step 3: Enable Warp Mode
Next, head to Clip View by double-clicking on the top part of your audio clip. Once open, activate Warp Mode by clicking on the grey Warp button. Once enabled, the warp button will turn yellow.
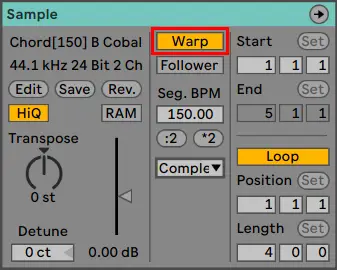
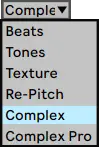
Expand the warp mode drop-down box and select Complex.
| Step 4: Show Envelopes Box
Head to the bottom left corner of the Clip View and select the Show Envelopes Box. An Envelopes section with a number of additional properties will appear on the right-side of the Clip View.
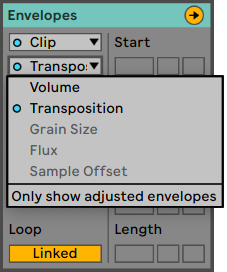
| Step 5: Choose Clip Device & Transposition Control
For the top drop-down box, select Clip and for the second drop-down box, select Transposition. An automation envelope will appear on top of your audio clip’s waveform, with the y-axis divided into semitones.
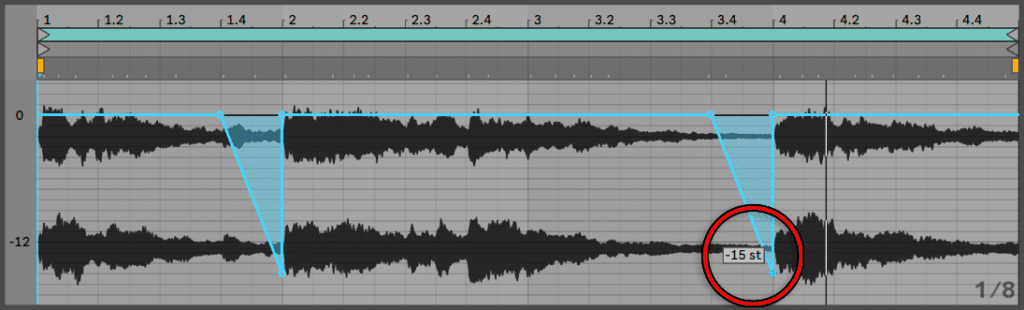
| Step 6: Automate Transposition
Lastly, craft a descending automation envelope (as seen in the example below) at the desired locations of your audio clip. Ensure Pencil Mode is turned off by toggling ‘B’ on your keyboard. This will allow you to create automation breakpoints and achieve a smooth tape stop effect.
I have found automating down to a value between –10st and –20st to be the most effective. Make sure to conclude your tape stops by shaping the automating envelope back to 0st.
Want To Know More?
Here at Live Aspects, we have dozens of useful lessons and tutorials created to enhance your music production skills and help speed up the learning process. You can access our huge range of music theory lessons and production tips and tricks here.