Ableton Live is a powerful music production suite that allows you to record, mix, edit and produce music without ever having to leave your computer. Ableton’s versatility and powerful workflow make it a powerful tool for creating music—and we want to help you get started.
Welcome to the Top 100 most frequently asked questions about Ableton Live. This is the ultimate resource for Ableton enthusiasts of any skill level.
Whether you’re looking at buying the software or wanting to step up your production game, this guide will help you learn more about Ableton Live and teach you how to use the software with ease. Created for both beginners and experienced producer, this guide is a great reference for anyone who wants to become more familiar with Ableton Live.
The questions are arranged by topic and each section is hyperlinked in the table below so you can quickly find what you’re looking for. If you have any unanswered questions that aren’t featured on this page, visit our collection of lessons and tutorials here or feel free to contact us.
Without further ado, let’s get started!
Introduction
Ableton Live 101
1. How To Open Arrangement View
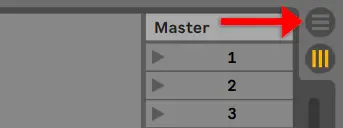
To toggle between Session and Arrangement View, simply press [TAB] on your keyboard or use the two icons in the top right corner of the Live window.
2. How To Pan In Ableton
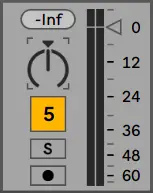
To pan in Ableton, start by heading to Session View and accessing the Mixer Section of the track you wish to pan. Here you will find the Track Pan knob located beside the track volume meter. Turning the knob left and right will pan the track accordingly.
3. How To Undo In Ableton
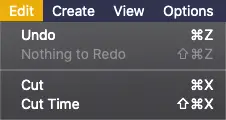
To Undo in Ableton, simply press [COMMAND + Z] on Mac or [CNTRL + Z] on Windows. Alternatively, head to the Edit menu at the top of the Live interface and select ‘Undo’.
4. How To Exit Full Screen In Ableton
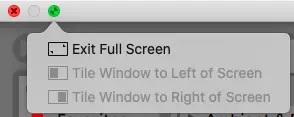
To enter or exit full screen in Ableton Live, move the cursor to the extreme top left of your screen and select the green button.
5. How To Loop In Ableton
To loop in Ableton, start by highlighting a region of your project in Arrangement View by left-clicking and dragging a selection of beats/bars. Next, press [COMMAND + L] on Mac or [CNTRL + L] on Windows. Alternatively, you can access the Edit menu and select ‘Loop Selection’.

6. How To Open Piano Roll In Ableton
To open the Piano Roll in Ableton, double-click on the top part of any MIDI clip. If you need to create a MIDI clip, first access Arrangement View then on a MIDI track, highlight a number of beats/bars and press [COMMAND + SHIFT + M] on Mac or [CNTRL + SHIFT + M] on Windows. Alternatively, you can simply double-click on any beat/bar to create a MIDI clip.
7. How To Rename Audio & MIDI Clips
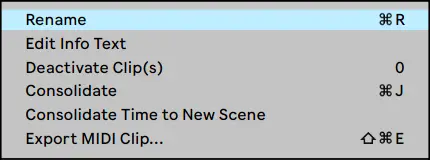
To rename Audio & MIDI clips, left-click anywhere on a clip and press [COMMAND + R] on Mac or [CNTRL + R]. Alternatively, right-click anywhere on a clip and select ‘Rename’.
8. How To Reverse Audio In Ableton
To reverse audio in Ableton, start by double-clicking on the top region of an audio clip. This will open up the clip view. Finally, under the Sample tab on the left of the waveform, select ‘Rev.’.

9. How To Map MIDI In Ableton
- Decide on a parameter in Live that you wish to control on your MIDI device
- Head to the top right corner of Live and select the ‘MIDI’ button or press [COMMAND + M] on Mac or [CNTRL + M] on Windows. All mappable parameters will now turn purple
- Left-click on the Live function you want to use with your MIDI device
- Press your chosen key, pad, knob, or button on your MIDI device to control this function
![]()
10. How To Warp A Track In Ableton
To warp an audio clip in Ableton, double-click the top of the clip to access to open clip view and select the ‘Warp’ button to the left of the waveform.
To most accurately warp an audio sample, type in the BPM of the sample into the ‘Seg. BPM’ box. If you are unsure of the sample’s tempo, Live will automatically estimate the sample’s BPM.

11. How To Turn Off Warp In Ableton
To unwarp an audio sample, simply double-click the top part of the audio clip and select the yellow ‘Warp’ button to the left of the waveform.

12. How To Quantize In Ableton
To quantize MIDI:
- Open the piano roll by double-clicking on the top half of a MIDI clip
- Select the MIDI notes that you wish to quantize or press [COMMAND + A] on Mac or [CNTRL + A] on Windows to select all notes within the MIDI clip
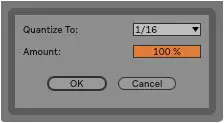
- Right-click on the piano roll and select ‘Quantize Settings’
- Adjust the quantize settings to your preference and click ‘OK’
To quantize Audio:
- Open up the clip view by double-clicking on the top half of an audio clip
- Select a region of the audio sample that you wish to quantize or press [COMMAND + A] on Mac or [CNTRL + A] on Windows to select the entire audio clip
- Right-click on the waveform and select ‘Quantize Settings’
- Adjust the quantize settings to your preference and click ‘OK’
(Note: For Audio and MIDI quantization, right-click and select ‘Quantize’ to instantly quantize using the settings previously used)
Relevant Post: ‘How To Quantize In Ableton Live‘
13. How To Add Swing In Ableton
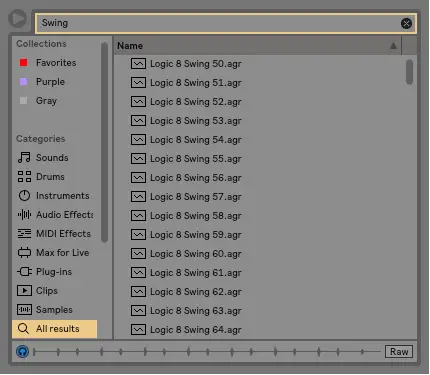
To add swing to an Audio or MIDI clip, follow these five simple steps:
- Double-click the top part of your Audio/MIDI clip to access clip view
- Search ‘Swing’ in Live’s Browser
- Select ‘All Results’ under the categories heading
- Click through the different grooves to hear a preview of each swing pattern
- Drag & drop your new groove into the ‘Groove’ box under the ‘Clip’ tab of your MIDI clip.
Relevant Post: ‘How To Use Swing In Ableton Live‘
14. How To Make Melodies In Ableton
To create melodies in Ableton, follow the steps below:
- Start by creating a MIDI track by accessing the Create menu and selecting ‘Insert MIDI Track’
- Add a MIDI instrument to your MIDI track from the ‘Sounds’ or ‘Instruments’ category in Live’s browser
- Create a MIDI clip by highlighting a number of beats/bars on your MIDI track and pressing [COMMAND + SHIFT + M] on Mac or [CNTRL + SHIFT + M] on Windows
- Double-click the top section of your MIDI clip to open piano roll
- Press ‘B’ on your keyboard to enable Draw Mode and select the small headphones icon above the piano roll to hear each MIDI note
- Draw melodies into the piano roll or record using a MIDI keyboard

15. How To Change Pitch In Ableton
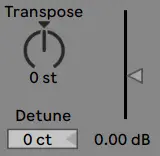
To change the pitch of an audio sample in Ableton, double-click on the top part of an audio clip to access the clip view then adjust the ‘Transpose’ knob in the sample box. The transpose knob allows you to alter the pitch of a sample by up to +/-48 semitones. For a more precise pitch adjustment, use the Detune function.
16. How To Change Octave In Ableton
To change the octave of MIDI:
- Double-click the top part of a MIDI clip to open piano roll
- Select all MIDI notes by pressing [COMMAND + A] on Mac or [CNTRL + A] on Windows
- Hold [SHIFT[ and press the up and down arrows to change the octave of your MIDI clip
To change the octave of Audio:
- Double-click the top part of an audio clip to open clip view
- Left-click the transpose knob
- Hold [SHIFT[ and press the up and down arrows to change the octave of your audio clip
17. How To Change Velocity In Ableton
To change the velocity of notes in a MIDI clip, start by double-clicking the top part of a MIDI clip to open the note editor. Next, head to the MIDI velocity editor below the collection of MIDI notes. Increase and decrease the velocity of each MIDI note by adjusting the height of each red line. If you cannot see the MIDI velocity editor, click the small triangle towards the bottom left of the note editor window.

18. How To Normalize In Ableton
To Normalize an audio sample in Ableton:
- Right-click audio clip and select ‘Consolidate‘
- Double-click audio clip to open clip view
- Navigate to the Clip Gain slider and double-click the arrow
To Normalize an Ableton project:
- Open the Export window by accessing File > Export Audio
- Ensure ‘Normalize’ is turned on
- Select ‘Export’
19. How To See Time In Minutes
Live users traditionally refer to the beats|bars grid when producing using Ableton. To see time in minutes, head to Arrangement View and navigate to the darker coloured region below your tracks. Here you will find the grid represented in minutes|seconds. You can view more precise timestamps the closer you zoom in.

20. How To Add Time In Ableton
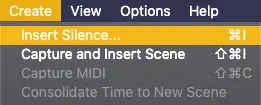
To insert time in the Arrangement View, simply press [COMMAND + I] on Mac or [CNTRL + I] on Windows. Alternatively, head to the Create menu and select ‘Insert Silence’. Next, you will be prompted to input the amount of bars and/or beats you would like to add.
21. How To Chop Up Vocals In Ableton
To chop up vocals in Ableton:
- Drag and drop an acapella onto an audio track
- Double-click the top part of the acapella to access clip view
- Select the Warp function and type in the tempo of the acapella into the Seg. BPM box
- Highlight the region of the acapella you want to chop up
- Right-click on the audio track and select ‘Slice to New MIDI Track’
- Select how large and how many slices you want, as well as the Slicing Preset
- Your acapella has now been chopped up and divided across the piano roll

22. How To Sample Drums In Ableton
To sample drums in Ableton:
- Drag and drop a beat or a song onto an audio track
- Set the project’s tempo to the tempo of the beat/song
- Double-click the top part of the beat/song to access clip view
- Disable Warp mode and ensure the start marker of the waveform is set to beat 1
- Use the grid on Arrangement View to slice up individual drum hits. To slice a portion of an audio clip, simply highlight the drum hit you would like to sample and press [COMMAND + E] on Mac or [CNTRL + E] on Windows
- Gather your new drum hits and place them into a Drum Rack to use them with a MIDI device
23. How To Create A Build-Up In Ableton
Every build-up is composed of different and unique sounding elements. However, traditional EDM build-ups will often contain one or many of the following elements:
- 1/16th Note Snares
- Uplifters/Downlifters
- Drum Fills
- Whitenoise
- Claps
- Vocal Sample/Loop
- High-Pitched Sustained Strings
- Low-Cut Filter Automation
- Reverb Automation
- Increasing Pitch Automation
To read a more in-depth tutorial, click here.

24. How To Create A Mixtape In Ableton Live
To create a Mixtape in Ableton:
- Head into Live’s Preferences and select the Record Warp Launch tab. Next, make sure ‘Auto-Warp Long Samples‘ is On and ‘Default Warp Mode‘ is set to Complex
- Select the songs you would like in your mixtape in Finder (Mac) or File Explorer (Windows). Next, hold [COMMAND] on Mac or [CNTRL] on Windows while dropping your tracks in Live to place each song onto its own audio track
- Check that the start markers of each track are set to the very first beat of the song. Start markers are the lower grey triangle in clip view
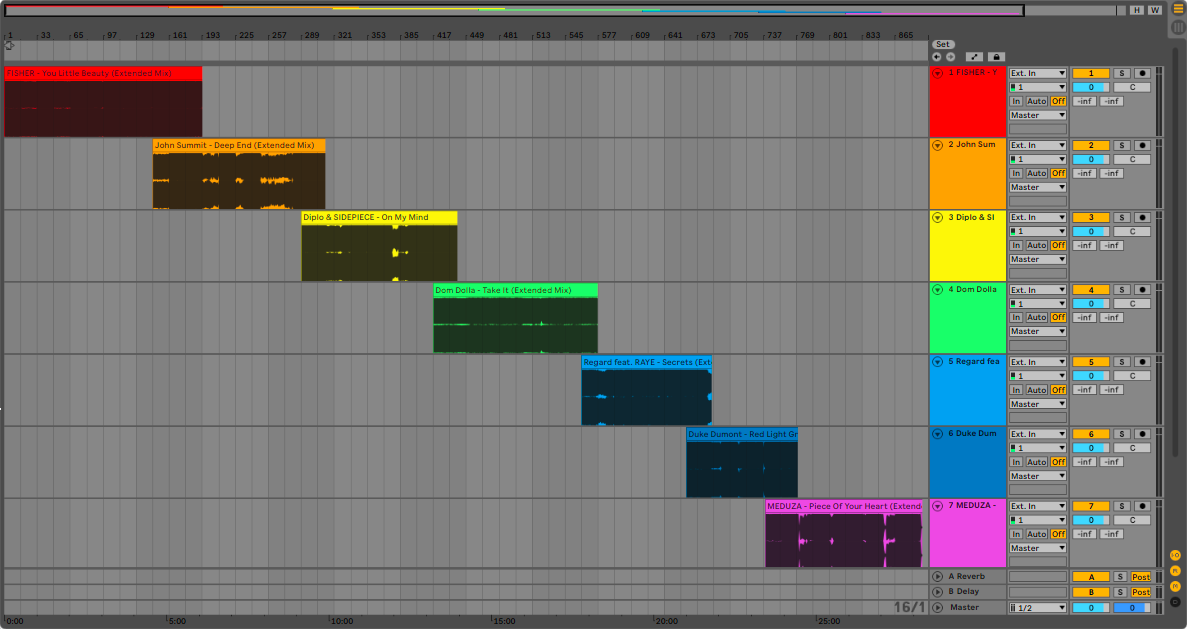
- Prepare to create transitions between your tracks by strategically placing each song across the timeline in Arrangement View. Creating an overlap between tracks allows songs to be gradually introduced and faded out
- Create seamless transitions by automating Volume and EQ. Methodically automating these two parameters will help you create the best transitions possible throughout your mixtape
Relevant Post: ‘How To Create A Mixtape In Ableton Live‘
Ableton Live Software
25. Is Ableton Free?
Ableton Live Intro, Standard and Suite are not free. However, Ableton has made a trial version of the software available for free download. Ableton Live Lite is a limited version of the software that lets you test out many of the features of Ableton without spending a cent. It is simple to install and has very few limitations. If you’d like to try out Ableton Live for zero cost, download the Lite version of Ableton here.
26. Is There A Free Version Of Ableton Live?
Ableton Live Lite is a free version of the software that lets you test out many of the features of Ableton without spending a cent. It is simple to install and has very few limitations. Ableton Live Lite is the perfect introduction to music production and live performance. If you’d like to try out Ableton Live for zero cost, download the Lite version of Ableton here.
27. How Much Does Ableton Live Lite Cost?
Ableton Live Lite is a free version of the software that lets you test out many of the features of Ableton without spending a cent. It is simple to install and has very few limitations. Ableton Live Lite is the perfect introduction to music production and live performance. If you’d like to try out Ableton Live for zero cost, download the Lite version of Ableton here.
28. How Much Does Ableton Live Intro Cost?
Ableton Live Intro costs $99 USD (or $16.50 USD per month for 6 months).

29. How Much Does Ableton Live Cost?
Ableton Live costs $449 USD (or $74.83 USD per month for 6 months).

30. How Much Does Ableton Live Suite Cost?
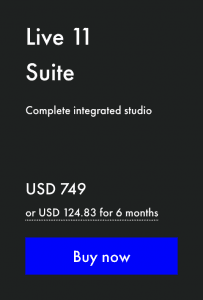
Ableton Live Suite costs $749 USD (or $124.83 USD per month for 6 months).
Relevant Post: ‘How Much Does Ableton Live Cost?‘
31. Where To Buy Ableton Live
Ableton Live can be purchased from the official Ableton website, as well as other online stores and physical stores around the world. To visit the Ableton online store, click here.
32. Can You Still Buy Ableton Live 9?
Unfortunately, Ableton does not sell official licenses for previous versions of Live. Only the most recent version of Live can be purchased from ableton.com. However, it is possible to purchase a secondhand license from a third party. For more information, click here.
33. How To Update Ableton
If you have Live 10.1.9 or later and have automatic updates enabled, Ableton Live will automatically update upon startup with each new release. To enable automatic updates, head to Live’s Preferences, select the ‘Licenses Maintenance’ tab and press ‘On’ next to Get Automatic Updates.
![]()
34. Are Ableton Upgrades Free?
Unfortunately, Ableton upgrades are not free. Upgrade prices vary depending on your current version of Live and which version you want to upgrade to. For example, an upgrade from Live 10 Suite to Live 11 Suite will cost $229. To upgrade, log into your Ableton.com account and head to the shop.
35. How Big Is Ableton Live 10?
Once installed, Live takes up approximately 3GB of hard-drive space. However, Ableton recommends to have at least 8GB of disk space available for installation and up to 76GB for additional available sound content.
36. What Is The Difference Between Live & Live Lite?
Live Lite is the free trial version of the Ableton Live software. It limits users to 8 Audio/MIDI tracks and does not allow for saving and exporting. Paid versions of Live (Intro, Standard & Suite) come with a larger library of instruments, sounds and additional features.
37. How Many Tracks Can You Have With Live Lite?
Ableton Live Lite limits users to 8 tracks, allowing any combination of Audio and MIDI tracks.
Compatibility
38. Can You Download Ableton On Windows?
Yes, Ableton Live can be downloaded on both Windows and Mac devices.
39. Can You Download Ableton On Multiple Computers?
Each Ableton Live license comes with two authorizations, meaning you can download and install Live on two computers. However, each license only allows you to use Live on one computer at a time.
40. Can A Macbook Air Run Ableton Live?
Yes, Ableton Live can run on a Macbook Air. However, your Macbook Air must have at least 4GB of RAM to run Ableton Live 10 and 8GB of RAM to run Ableton Live 11.
41. Does Ableton Work On iPad?
Unfortunately, Ableton Live is not compatible on iPad. The Apple app store however, does contains a variety of compatible third party applications which can be used to accompany Live on your Mac or Windows device. Try searching ‘Ableton Live’ on the app store to find a compatible iPad application alternative.
42. Which Audio File Formats Does Ableton Support?
Ableton supports a variety of audio formats, as well as some video formats. These include WAV, AIFF, FLAC, OGG, MP3, and M4A/MP4.
43. How Much RAM Do I Need To Run Ableton?
As suggested by Ableton, the minimum RAM required to run Ableton Live 10 is 4GB but it is recommended to have more if possible. For Ableton Live 11, a minimum of 8GB of RAM is needed. These requirements are for both Mac and Windows devices.
Relevant Post: ‘How Much RAM? | The Best Specs For Ableton Live‘
44. Can You Use Ableton Push With FL Studio?
While there are ways to use some Push functionalities with FL Studio, Ableton Push is not designed to be compatible with software other than Ableton Live. If you are looking at purchasing an Ableton Push, it is strongly recommended that you also grab a copy of Ableton Live.
45. Does Ableton Push Work With Logic?
While there are ways to use some Push functionalities with Logic, Ableton Push is not designed to be compatible with software other than Ableton Live. If you are looking at purchasing an Ableton Push, it is strongly recommended that you also grab a copy of Ableton Live.
Ableton Preferences
46. How To Save As Default Template
To save your current project as the default template, head into Live’s preferences by pressing [COMMAND + ,] on Mac or [CNTRL + ,] on Windows. Under the ‘File Folder’ tab, press ‘Save’ to the right of ‘Save Current Set as Default’. Live will now use the current settings and configurations as the initial default values for new Live sets.
![]()
47. How To Change Ableton Skin
To change the Ableton skin, follow the below steps:
- Start by opening Live’s preferences in the top menu bar
- Select the ‘Look Feel’ tab at the top left of the preferences window.
- Under the ‘Colors’ heading, select the ‘Theme’ drop-down box. Choose from the five pre-installed themes that come with each version of Live. Any additional installed themes are also listed here.
48. How To Install Ableton Themes
Mac:
1. Download and copy the theme by selecting the .ask file and pressing [COMMAND + C]
2. Access the Applications folder in Finder, locate the Ableton application, right-click it and select ‘Show Package Contents’
3. Head to Content > App Resources > Themes and paste the theme by pressing [COMMAND + OPTION + V]
Windows:
1. Download and copy the theme by selecting the .ask file and pressing [CNTRL + C]
2. Head to C:\ProgramData\Ableton\Live 10 Suite\Resources\Themes
3. Paste the theme by pressing [CNTRL + V]
49. Where Are Ableton Packs Stored?
The default location for installed Packs on Mac devices is:
Macintosh HD/Users/[YourUsername]/Music/Ableton/Factory Packs
The default location for installed Packs on Windows devices is:
\Users\[user]\Documents\Ableton\Factory Packs
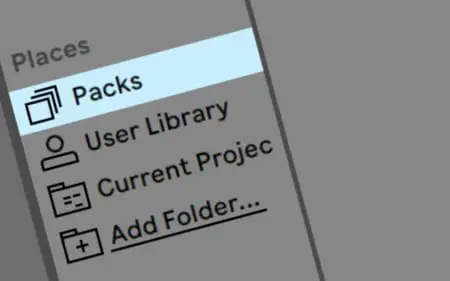
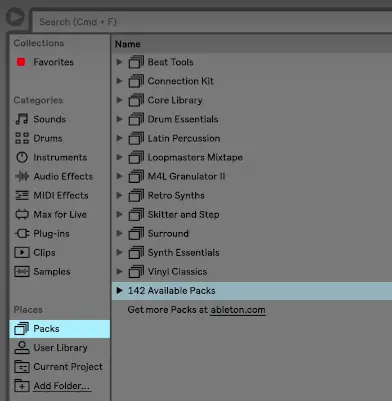
To access Live’s Packs within your project, head on over to the Browser on the left side of the Live interface. Next, select ‘Packs’ under the ‘Places’ heading.
50. How To Add Packs To Ableton
- Head to the Packs tab at Ableton.com
- Download a Pack
- Open Ableton Live
- Once downloaded, simply drag Pack into the Live window to install
- Your new Pack will be located under the ‘Packs’ section in Live’s Browser
For a more in-depth tutorial, click here.
51. How To Uninstall Ableton Live
Mac:
To uninstall Ableton Live on Mac, head to your Applications folder in Finder and drag and drop the Ableton Live application into the trash bin. Alternatively, you can right-click the application and select ‘Move to Trash’.

Windows:
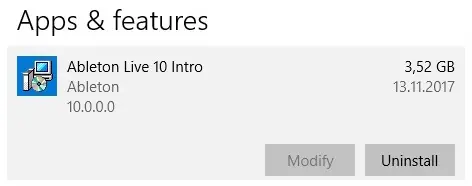
To uninstall Ableton Live on Windows, head to the Windows Control Panel via Start → Settings → System → Apps and Features. Search for the Ableton Live application and click the Uninstall button.
52. How To Authorize Ableton Offline
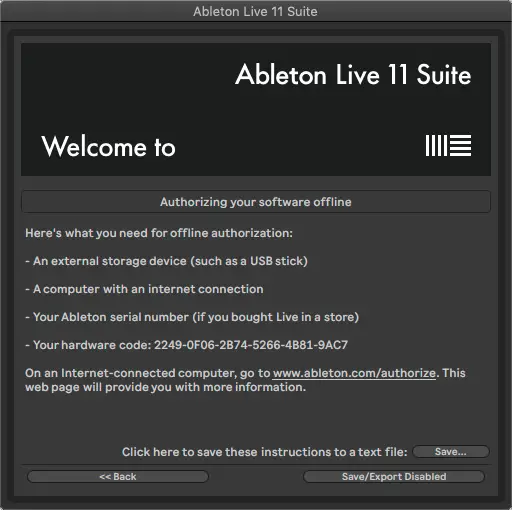
To authorize Ableton Live offline, follow the following steps:
- Install and open Ableton Live
- Select ‘No Internet on this computer’
- Note down the hardware code
- On a device with an internet connection, login to your Ableton user account here
- Select your Live license and click authorize offline
- Select which product you would like to authorize and input your hardware code
- Press ‘Download’ and save the .auz file onto a portable storage device
- Insert the portable device into the computer with Live installed
- Open Live and double click the .auz file or drag it onto the authorization window
For a more in-depth tutorial, click here.
53. How To Setup Focusrite Audio Interface With Ableton
To setup a Focusrite audio interface for use with Ableton:
- Install any accompanying software such as drivers or controls. To check if your Focusrite interface requires drivers or controls, click here.
- Plug your interface into your computer via USB cable
- Access Live’s preferences and select the ‘Audio’ tab
- Start by selecting ‘CoreAudio’ as your Driver Type. For the Audio Input Device and Audio Output Device, select your Focusrite interface.
- You’re all set to start recording using your Focusrite audio interface!
Relevant Post: ‘How To Use A Focusrite Audio Interface With Ableton Live‘
54. How To Restore Ableton Set After Crash
Unlike many other DAWS, Ableton makes it possible to restore a Live Set in the unfortunately event of a crash. If faced with an Ableton crash, simply re-open Live and you will be prompted with a restore document dialog window.
If you aren’t prompted with the restore document dialog or you accidentally select ‘No’, you may need to manually restore it from an undo backup. To learn how to manually restore a Live set, click here.

55. How To Connect Microphone To Ableton
To connect a microphone and record in Ableton:
- Make sure your audio interface is set up correctly
- Head to Live’s preferences and under the Audio tab, ensure the Audio Input Device is set to your audio interface
- Plug your microphone into an input on your audio interface
- Create an audio track by accessing the Create menu and selecting ‘Insert Audio Track’
- Below the Ext. In drop-down box on the audio track, select the input that you’ve connected the microphone into on your interface
- Select the Arm Recording button in the mixer section of your audio track
- Test and adjust the input level and aim for a loud signal without having the meter go into the red
- Click the record button in the top bar to begin recording. Press spacebar to stop recording
Importing & Exporting
56. How To Import Audio
To import audio into your Ableton session, simply drag and drop an audio file from Finder/File Explorer onto an audio track in Session or Arrangement View. If you’re importing multiple pieces of audio, hold down [COMMAND] on Mac or [CTRL] on Windows to place each file onto its own audio track.
57. How To Import Sample Packs Into Ableton
To import Sample Packs into Ableton Live’s browser:
- Head to Live’s Browser and select ‘Add Folder’ under the Places category.
- Navigate to the location of your Sample Pack/s and press ‘Open’.
- Your Sample Packs will now be located in a folder under the Places category in Live’s Browser.
Relevant Post: ‘How To Import Sample Packs Into Ableton Live‘
58. How To Import Video Into Ableton
To import video into Ableton, simply drag an .MP4 or .MOV file from Finder (Mac) or File Explorer (Windows) anywhere onto the Arrangement View. The audio will appear on the Arrangement View and the video will appear in an external window. To reveal/hide the video window, press [COMMAND + OPTION + V] on Mac or [CNTRL + ALT + V] on Windows.
59. How To Export In Ableton
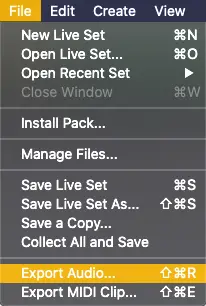
To export your Ableton project, navigate to the File menu at the top of the Live interface and select ‘Export Audio’. Alternatively, you can press [COMMAND + Shift + R] on Mac or [CTRL + Shift + R] on Windows.
60. How To Export Stems
To export your project into individual stems, follow the below steps:
- Open the export window by selecting File > Export Audio or pressing [CMD + Shift + R] on Mac or [CTRL + Shift + R] on Windows.
- Click the ‘Rendered Track’ drop-down box under the Selection category and set to ‘All Individual Tracks’.
- Turn off ‘Render As Loop’, ‘Convert to Mono’ and ‘Normalize’.
- Ensure your ‘Sample Rate’ is set to a minimum of 48,000 samples. Finally, enable ‘Encode PCM’ and select either WAV or AIFF as your export file type.
- Select the ‘Export’ button then wait for Ableton to save your stems as individual audio stems.
61. How To Export To MP3
Ableton only allows users to export uncompressed, maximum quality audio and while an MP3 file is conveniently smaller, the audio quality is not as high. Although Ableton does not provide a direct way to export your project as an MP3 file, there are a handful of different ways to convert the available export file types (WAV and AIFF) to MP3:
• Online Audio Converters – Search the internet for an Online Audio Converter and find the one that suits you best.
• Audio Conversion Software – A simple search on Google or your computer’s app store will give you an endless amount of options, including the ability to convert your WAV or AIFF file to formats other than MP3.
62. How To Export MIDI In Ableton
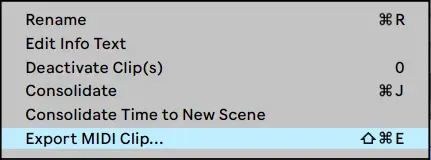
To export a MIDI clip in Ableton, simply right-click anywhere on a MIDI clip and select ‘Export MIDI Clip’. Alternatively, you can left-click the top region of a MIDI clip and press [COMMAND + SHIFT + E] on Mac or [CNTRL + SHIFT + E] on Windows.
63. How To Bounce MIDI To Audio
To bounce MIDI to audio, follow the steps below:
- Solo the MIDI track that contains the MIDI clip(s) you want to export
- On Arrangement View, select a MIDI clip or highlight a region of a MIDI track you want to bounce to audio
- Open the Export window by selecting ‘Export Audio’ from the File menu
- Decide on your export settings and audio format then select ‘Export’
64. How To Add MIDI Files To Ableton
To add a MIDI file to your Ableton project, start by creating a MIDI track by accessing the Create menu and selecting ‘Insert MIDI Track’. In Finder (Mac) or File Explorer (Windows), navigate to the MIDI clip you would like to add and simply drag it onto the MIDI track in either Session or Arrangement View.
65. How To Send Ableton Projects
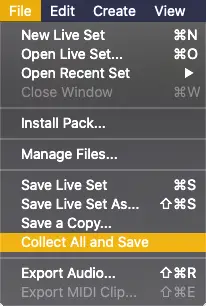
- Head to the File menu and select ‘Collect All and Save’
- Select ‘Yes’ on each used media file
- Click ‘OK’
- Navigate to the folder where you project file is located
- Compress your project into a .zip/.rar file to distribute online or copy onto an external storage device
66. How To Merge Ableton Sessions
To import tracks from another project and merge multiple Live sessions:
- Navigate to Live’s Browser and search for the title of a previously saved project
- Select ‘All Results’ under the Categories heading
- Click on the arrow beside your project .als to reveal all the tracks within that project
- Click and drag a track into the Session or Arrangement View of the project currently open. To import multiple tracks at once, hold down [COMMAND] on Mac or [CNTRL] on Windows and left-click any number of tracks
Tracks
67. How To Group Tracks In Ableton
To group tracks in Ableton, follow the three steps below:
- Start by dragging the Audio and/or MIDI tracks that you would like to group together so they become adjacent in the track list.
- Hold [COMMAND] on Mac or [CNTRL] on Windows and left-click each track you would like in a group.
- Right-click on any of the selected tracks and click ‘Group Tracks’. Alternatively, you can press [COMMAND + G] on Mac or [CNTRL + G] on Windows to group selected tracks.
68. How To Create A Bus In Ableton
To create a Bus in Ableton:
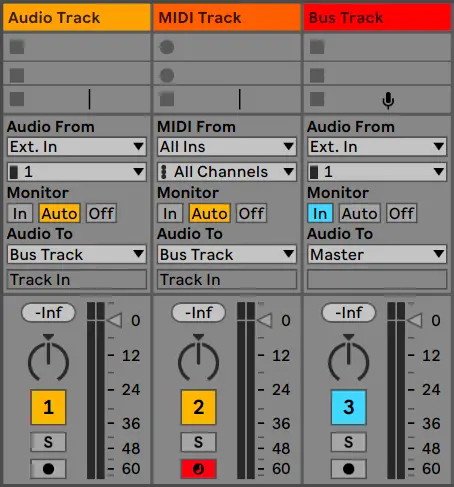
- Create an Audio track by selecting the Create menu and selecting ‘Insert Audio Track’. This will become the Bus track
- On this Audio track, select ‘In’ under the Monitor heading
- For any other MIDI or Audio tracks we want sent to the Bus track, route the ‘Audio To’ to the title of the Bus track
69. What Is A Return Track?
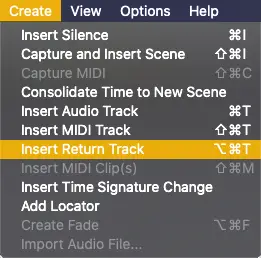
A return track (also known as an aux or auxiliary track) accepts audio signals that are sent to it from other tracks. A return track does not contain audio or MIDI clips but rather, contains a group of effects that Audio and MIDI tracks can output into. Their purpose is purely to host effects for other Audio and/or MIDI tracks.
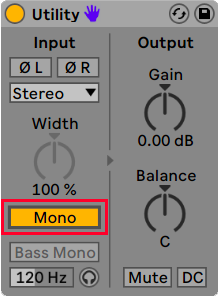
70. How To Make A Track Mono
To make an Audio or a MIDI track mono, simply head to Live’s browser, select the ‘Audio Effects’ category and add Utility to the target track. Next, select the ‘Mono’ button. When enabled, the Mono function will convert any stereo input to mono.
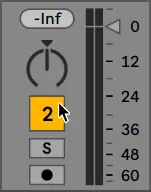
71. How To Mute A Track In Ableton
To mute a track in Ableton, simply navigate to the Mixer Section of a track and select the yellow numbered box known as the Track Activator.
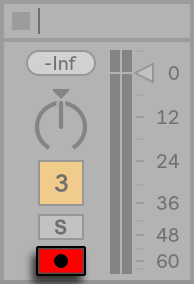
72. How To Arm A Track In Ableton
To arm a track for recording, navigate to the mixer section and select the black dotted button near the track activator and solo/cue button. The arm recording button will turn red once a track has been successfully armed. To arm recording on multiple audio tracks, simply hold [COMMAND] on Mac or [CNTRL] on Windows and click each arm recording button.
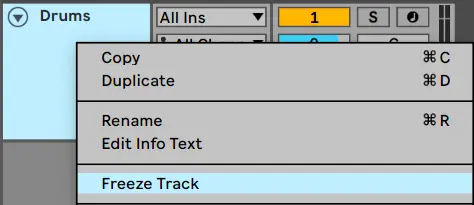
73. How To Freeze & Flatten In Ableton
To freeze and flatten a track in Ableton, right-click the track name section of an Audio or MIDI track and select ‘Freeze’. Once frozen, right-click the track name section again and select ‘Flatten’
Editing Clips In Arrangement View
74. How To Crossfade In Ableton
To crossfade in Ableton, start by placing two audio clips directly adjacent to each other in Arrangement View. Next, move your cursor to where the two audio clips meet. In the corners, you will see two fade handles appear. Select the top fade handle from either audio clip and drag it on to the other clip. Use both fade handles and the fade curve handle to create a crossfade.
(Note: In order to see fade handles, ensure Automation Mode is disabled)

75. How To Crop In Ableton
To crop Audio or MIDI clips in Ableton, move your cursor to the top section of a clip, either at the beginning or the end of the clip. The shape of your cursor will become a square bracket. Hold left-click and drag to increase or decrease the size of the clip. Hold [COMMAND] on Mac or [CNTRL] on Windows while cropping for a more precise crop that does not snap to the grid.

76. How To Split A Clip In Ableton
To split an audio or a MIDI clip, left-click the beat/bar where you wish to make a split and press [COMMAND + E] on Mac or [CNTRL + E] on Windows. Your clip will now be two seperate clips.

77. How To Slice In Ableton
To slice a portion of an audio or a MIDI clip, simply highlight the region of a clip that you would like to remove and press [DELETE] on your keyboard.

Relevant Post: ‘How To Edit Audio In Ableton Live‘
Automation
78. How To Automate In Ableton Live
To automate in Ableton Live, start by enabling Automation Mode by selecting ‘A’ on your keyboard or left-clicking the button above your first track in Arrangement View. Next, left-click the parameter you would like to automate to reveal the automation arm on the target track. Finally, draw in automation by creating breakpoints and moving them vertically up and down the grid.

79. How To Automate Pitch (Audio)
To automate pitch on an audio clip, start by double-clicking the top section of the clip on Arrangement View to open the clip view. Next, select the ‘Show Envelopes Box’ icon in the bottom left and under the ‘Envelopes’ heading, select ‘Clip’ and ‘Transposition’. You can now draw in pitch automation over the audio clip waveform. (Ensure Warp mode is enabled)

80. How To Automate Pitch (MIDI)
To automate pitch on a MIDI clip, start by double-clicking the top section of the clip on Arrangement View to open the note editor. Next, select the ‘Show Envelopes Box’ icon in the bottom left and under the ‘Envelopes’ heading, select ‘MIDI Ctrl’ and ‘Pitch Bend’. You can now draw in pitch automation over the MIDI notes.

81. How To Copy Automation In Ableton
To copy automation in Ableton, start by enabling Automation Mode by pressing ‘A’ on your keyboard. Next, highlight the beats/bars that contains the automation you wish to copy. Lastly, press [COMMAND + C] on Mac or [CNTRL + C] on Windows to copy the automation to your clipboard. You can paste the automation elsewhere by pressing [COMMAND + V] on Mac or [CNTRL + V] on Windows.

82. How To Fade Out A MIDI Track
As MIDI clips do not contain fade out handles, volume automation is required in order to fade out a MIDI track. Start be enabling automation mode by pressing ‘A’ on your keyboard or selecting the icon above the track list in arrangement view. Next, select ‘Mixer’ on the Device Chooser and ‘Track Volume’ on the Automation Control Chooser on your MIDI track. Finally, create a fade out using volume automation.

Relevant Post: ‘How To Automate In Ableton Live‘
Plugins
83. How To Load A Plugin In Ableton
To load a plugin in Ableton, start by navigating to the Categories section of Live’s browser.
To load an Instrument plugin, select ‘Instruments’ or ‘Sounds’.
To load an Audio Effect plugin, press ‘Audio Effects’.
To load a MIDI Effect, click ‘MIDI Effects’.
To load an external third-party plugin, select ‘Plug-Ins’.
Once you have decided on the plugin you wish to add, simply drag the plugin onto an Audio or MIDI track or double-click it to add it to the track currently selected.
(Note: Audio Effects can be added to both Audio and MIDI tracks. MIDI Effects, Sounds and Instruments can only be added to MIDI tracks)
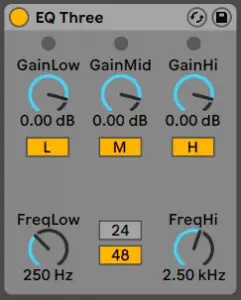
84. How To EQ In Ableton
Ableton comes with several EQ plugins. To EQ in Ableton:
- Select the ‘Audio Effects’ category from Live’s browser
- Decide on the EQ plugin you would like to use
- Click and drag it onto the track you would like to EQ
- Adjust the EQ parameters
85. How To Add Reverb In Ableton
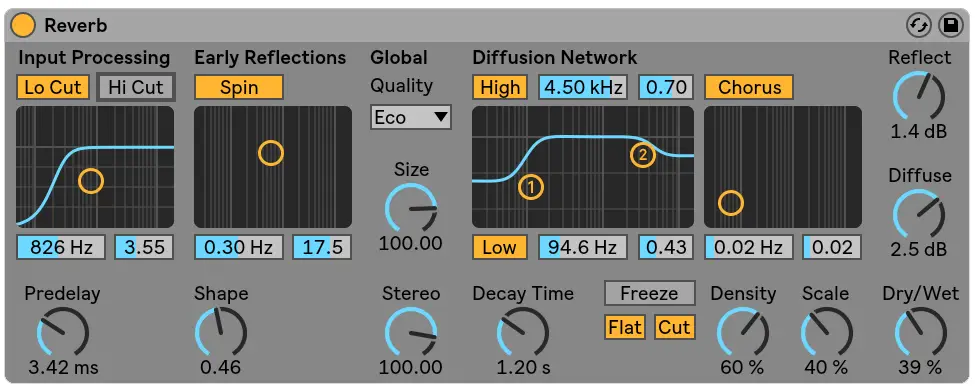
To add reverb in Ableton Live, follow the six steps below:
- Click on the Audio/MIDI track you want to add Reverb to
- Navigate to the search bar above Live’s Browser
- Search ‘Reverb’
- Select ‘All Results’ under the categories heading
- Double-click on the Reverb plugin or select a preset you would like to add
- Edit reverb plugin to create your preferred reverb effect
86. How To Arpeggiate In Ableton
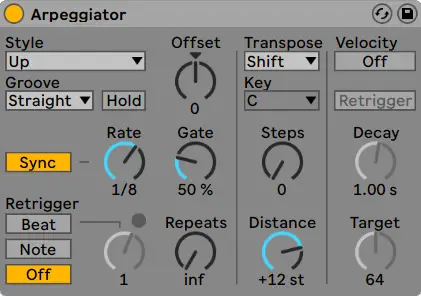
To Arpeggiate in Ableton, follow the steps below:
- Start by creating a MIDI track
- Add a MIDI instrument to your MIDI track
- Create a MIDI clip
- Double-click the top section of your MIDI clip to open piano roll
- Draw or record a sustained chord progression
- Navigate to Live’s browser and locate ‘Arpeggiator’ from the ‘MIDI Effects’ category
- Double-click or drag the Arpeggiator plugin onto your MIDI track
- Customize the settings of the Arpeggiator plugin to create an arpeggiated melody
For a more in-depth tutorial on Live’s Arpeggiator plugin, click here.
87. How To Run 32-bit Plugins in Ableton Live
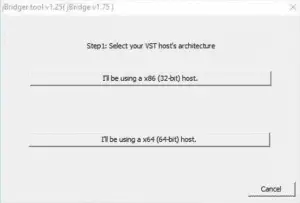
J-Bridge makes it possible to run 32-bit plugins in Ableton Live. It is a light-weight application designed for bridging VST plug-ins on Mac and Windows. It makes it possible to use outdated plug-ins in any DAW. You can download this amazing software for under $20 or try out the demo version for free.
jBridge for Mac
jBridge for Windows
88. Does Ableton Come With Autotune?
Unfortunately, all versions of Ableton Live do not come with Auto-Tune. Auto-Tune is an external VST plugin created by Antares Audio Technologies. To purchase or read more about Auto-Tune, you can visit the Antares website here.\
Tempo & Metronome
89. How To Turn On Metronome In Ableton
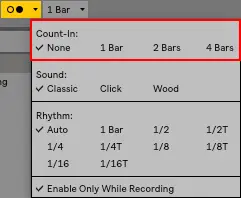
To turn on Ableton’s metronome, head to the top bar and left-click the Metronome icon (the two circles with a down arrow on the right). To access various metronome options such as setting a Count-In or changing the metronome sound and rhythm, left-click the down arrow to the right of the two circles.

90. How To Change Tempo In Ableton
To change the tempo of your Ableton project, head to the top left corner of the Live window. The current tempo will be displayed in beats per minute (BPM). To change the tempo, click on the current tempo and type in a new value. Alternatively, you can click, hold and drag up and down to increase and decrease the tempo.
For a more precise tempo adjustment, hold [SHIFT] while dragging the tempo up or down.

Relevant Post: ‘How To Change Tempo In Ableton Live‘
91. How To Tap Tempo In Ableton Live
To tap tempo in Ableton, move your cursor to the ‘Tap’ button in the top left corner of the Live interface and click four times at the tempo you wish to set your project. Live will calculate the speed at which you tapped and set it as the new project tempo.

92. How To Set A Count-In
To set a Count-In, head to the top bar above the Live interface and press the down arrow to the right of the metronome icon. Here you can select a length of Count-In you would like. Once the recording button is activated, the Count-In will initiate.
Other
93. Is Ableton Live Worth It?
The bottom line is, yes! Ableton is worth it. Ableton contains an incredible set of stock plugins and instruments that match the professionalism of some of the best third party plugins. The sleek software interface and flexible workflow makes it easy for creatives to make their own sound. Live has become the industry standard and if you’re serious about music production, then Ableton is a must-have.
Relevant Post: ‘10 Reasons Why Ableton Live Is The Best DAW‘
94. Is Ableton Easy To Use?
Live is one of the easiest DAWs to learn and use. Understanding the fundamentals of Ableton is simple. The minimalistic interface and pre-installed instruments and sounds makes it easy for eager musicians to get started. Live’s outstanding workflow features and it’s simple to operate tools makes it one of the most easy DAWs to use.
Relevant Post: ‘Is Ableton Difficult To Learn?‘
95. How Long Does It Take To Learn Ableton?
Understanding the basics of Ableton usually takes somewhere between a few days to a week. Depending on your history in music production, it will likely take months of dedication before your productions start sounding professional. In most cases, it should take six months to a year of exclusively using Live before it becomes ‘second-nature’.
96. How To Reduce Latency In Ableton
The top proven strategies for reducing lag and latency in Ableton are:
- Freeze Tracks
- Remove Stop Buttons
- Lower Your Sample Rate
- Increase The Buffer Size
- Avoid Warping
- Delete Un-used Tracks, Clips & Plugins
- Disable Hi-Q Mode on Audio Clips
- Disable EQ Eight Spectrum Analyser
- Set Reverb Quality To Eco
To read a more in-depth tutorial, click here.
97. Do You Need A MIDI Keyboard To Use Ableton?
Live users do not need a MIDI keyboard in order to use Ableton. You can draw melodies, harmonies and chords directly into the piano roll or use your QWERTY keyboard as a makeshift MIDI keyboard.
Relevant Post: ‘Do I Need A MIDI Keyboard For Ableton?‘
98. What Is Max For Live?
Max For Live is a programming platform that allows you to build your own instruments and effects. Program additional functionality into Ableton using Live’s integrated version of Cycling 74′ Max/MSP. Max For Live is included in Live Suite but can be purchased as an additional add-on with Live Standard.
If you would like to try out Cycling 74′ Max/MSP, you can download the demo for free here.
99. What Is Ableton Push?
Ableton Push is a MIDI instrument that provides hands-on control of melody and harmony, beats, samples, sounds, and song structure. It comes with 64 MIDI pads and a library of built-in sounds and samples designed to inspire creativity. Launch clips, edit samples, record in real-time, create drum sequences and much more. Built for complete integration with Live, Push puts everything you need to make music at your fingertips.
100. Which Artists Use Ableton Live?
The top 10 artists that use Ableton are:
- David Guetta
- Marshmello
- Skrillex
- DJ Snake
- Diplo
- The Chainsmokers
- Steve Aoki
- ILLENIUM
- Flume
- KSHMR
To read a more in-depth list, click here.
Related Posts:
Ableton Live 101 | The Complete Beginner’s Guide
30 Ableton Live Keyboard Shortcuts You Need To Know
Top 10 Artists That Use Ableton Live In 2022
Want To Know More?
Here at Live Aspects, we have dozens of useful lessons and tutorials created to enhance your music production skills and help speed up the learning process. You can access our huge range of music theory lessons and production tips and tricks here.